The Fresh Loaf

A Community of Amateur Bakers and Artisan Bread Enthusiasts.

Most bookmarked

dmsnyder's picture
dmsnyder

Baguette Tradition after Phillip Gosselin

I don't know how many different formula's for baguettes I've tried, but the one with the best flavor was that for the Pain à l'Anciènne of Phillip Gosselin. (See: http://www.thefreshloaf.com/node/8524/philippe-gosselin039s-pain-à-l039ancienne-according-peter-reinhart-interpretted-dmsnyder-m).

During our recent visit to Paris, one of the breads we had was Gosselin's Baguette Tradition, and it was very similar to the Pain à l'Anciènne I had made. The differences were that the crumb was more open, chewier and had a mild sourdough tang. I don't know whether Gosselin makes his Baguette Tradition using the same long cold retardation as employed in his Pain à l'Anciènne, but I suspect he does.

Gosselin's Baguette Tradition from the bakery on Rue Caumartin

Gosselin's Baguette Tradition crumb

Today, I made baguettes using the Gosselin technique, but I substituted a liquid levain for the yeast … well, I did also spike the dough with a little instant yeast to better control the fermentation time.

Ingredients

Wt.

Baker's %

WFM Organic AP Flour

400 g

100

Ice Water

275 g

69

Salt

8.75 g

2

Liquid Levain

200 g

50

Instant yeast

¼ tsp


Total

883.75 g

221

Note: Accounting for the flour and water in the levain, the total flour is 500 g and the total water is 375 g, making the actual dough hydration 75%. The actual salt percentage is 1.75%.

Method

  1. The night before baking, mix the flour and levain with 225 g of ice water and immediately refrigerate.

  2. The next morning, add the salt, yeast and 50 g of ice water to the dough and mix thoroughly. (I did this by hand by squishing the dough between my fingers until the water was fully incorporated.)

  3. Place the dough in a lightly greased bowl with a tight cover.

  4. Ferment at room temperature until the dough has about doubled in volume. (3 hours for me) Do stretch and folds in the bowl every 30 minutes for the first two hours.

  5. An hour before baking, pre-heat the oven to 500ºF, with baking stone and steaming apparatus in place.

  6. Divide the dough into 4 more or less equal pieces and stretch each into a 12-14 inch long “baguette.”

  7. Score and bake immediately at 460ºF, with steam for 10 minutes, and for about 20 minutes total.

  8. Cool on a rack before eating.

Baguettes Tradition

Baguette Tradition crumb

The crust was crunchy and the crumb was nicely open and chewy. It was moderately sour but with nice sweet flavors as well. All in all, it was quite similar to the baguette tradition we had from Gosselin's bakery. The loaves are smaller with proportionately more crust than crumb. The crust was a bit thinner, and the crumb a bit chewier. My totally unbiased, super taster spouse declared it “much better” than what we had in Paris. I don't know about that, but it is quite good – close to my notion of a perfect sourdough baguette - and I expect to make it again and again.

David

Submitted to YeastSpotting

subfuscpersona's picture
subfuscpersona

Baking Bread in Cast Iron - No Preheat Method - Photos!

There has been a flurry of discussion in the past weeks on baking bread in a cast iron dutch oven. Many TFL members use this method. It produces great breads but many find it problematic to lower the risen dough into a preheated pot.

On November 9, 2010, TFL member dmsynder asked whether it was necessary to preheat a cast iron dutch oven prior to baking in order to get a good rise and crust. (His post can be found here).

Here's the collective answer ...

> preheat the oven

> do NOT preheat the cast iron dutch oven and lid

> grease the dutch oven and let your dough rise directly in it

Here's my detailed illustration of this method with photos (with thanks to everyone who went before me)


=== EQUIPMENT ===

I used a two-quart capacity non enameled cast iron dutch oven. For the lid, I used a non enameled cast iron skillet, placed upside-down on the dutch oven. The diameter of my dutch oven and skillet are identical, so I get a good seal during the initial baking. The dutch oven is 3 inches high and the skillet is 1 & 1/2 inches high, so I have 4 & 1/2 inches interior height in total. Here's a photo of the assembly...

CAST IRON DUTCH OVEN AND CAST IRON SKILLET ASSEMBLY


=== INGREDIENTS ===

The bread recipe I use is a fairly standard sourdough. Ingredients are refreshed sourdough starter (at 100% hydration), commercial unbleached white bread flour, organic whole wheat flour, water and salt. Whole wheat flour is 20% of total flour. Dough hydration is 72% (this includes the water in the levain).

I baked two loaves. For each two-quart capacity dutch oven, I had 18 ounces (prebaking weight) of dough.


=== FINAL PROOF ===

The dutch oven was lightly greased. After shaping, the dough proofed directly in the dutch oven. During proofing, each dutch oven was slipped into a food grade plastic bag. (I help myself to these bags from the produce section of my favorite supermarket  - they're just the right size).

When ready to bake, the dough had risen close to the top of the dutch oven.

RISEN DOUGH IN CAST IRON DUTCH OVEN READY TO BAKE


=== INITIAL BAKING ===

The oven had been thoroughly preheated to 500F so it was ready when the dough was ready.

The dough was slashed, lightly misted, covered and loaded into the oven. The oven temperature was lowered to 475F, so it baked at somewhere between 500F to 475F for twenty minutes. At the end of this time, the dough had risen about 1 & 1/2 inches, slashes had opened and the dough was just beginning to color.

BREAD 20 MINUTES INTO BAKING CYCLE


=== FINAL BAKING ===

The lid was removed, temperature was lowered to 450F and the bread baked in the (uncovered) dutch oven for 20 minutes more. At the end of the bake, when removed to the cooling rack, I was delighted to hear the (greatly desired) crackling as the crust cooled. After cooling, the post-baking weight of each loaf was slightly over 16 ounces.

FINAL LOAVES


eclair tray

Want to impress your sweetheart this Valentine's Day? REALLY impress your sweetie? Then make these éclairs.

They look like they'd be a ton of work, don't they? I thought they would be, but they really aren't that hard. From first flipping open the cookbook (the 1997 edition of the Joy of Cooking) to the moment I was getting blissed out eating them was under two hours. Not bad at all, and fresh out of the oven these were the best éclairs I've ever had.

Eclairs

There are three parts to éclairs: the pastry (pâte à choux), the filling (crème pâtissière), and the topping (chocolate ganache). If you are strapped for time you could cut corners on one or more of the parts by doing things like using frozen puffed pastry for the pastry, pudding or whipped cream for the filling, or some other frosting for the topping. Take a look at the recipes before doing so though: none of the pieces are that hard. There are a few places where you have to bring things to a boil carefully to prevent scalding, but I've found that if you warm the ingredients in the microwave before combining them in your sauce pan you can easily cut 10 or 15 minutes of stirring out of the process.

Choux Paste (pâte à choux)

1 cup all-purpose flour

1/2 cup water

1/2 cup milk

1 stick (8 tablespoons) unsalted butter

1/2 teaspoon salt

4 eggs

Combine the water, milk, butter, and salt in a small saucepan. Bring it to a boil. Stir in the flour and, while mixing, cook another minute or 2 to eliminate excess moisture. Transfer to a bowl and let cool for 5 minutes, stirring occasionally.

choux paste

Beat in one egg at at time. When they have all been beaten in and the paste is smooth and shiny, set aside to cool. The paste may be use immediately or covered and refrigerated for later use.

Pastry Cream (Crème Pâtissière)

1/3 cups sugar

2 tablespoons all-purpose flour

2 tablespoons corn starch

4 egg yolks

1 1/3 cups milk

3/4 teaspoon vanilla

Combine the sugar, flour, corn starch, and egg yolks in a bowl. Beat with an electric mixer for 2 minutes until the mixture is thick and pale yellow.

egg mixture

In a small saucepan, bring the milk to a boil. Gradually pour the milk into the egg mixture, stirring it in as you do so. When fully combined, pour all of it into the saucepan and bring to a boil, whisking constantly. Boil for 1 to 2 minutes then remove mixture from heat. Stir in the vanilla and set aside to cool.

Cover the top with wax paper or parchment to prevent a skin from forming. This cream may be refrigerated for a day or two before use or used immediately.

Chocolate Ganache

3/4 cup heavy cream

8 ounces semisweet or bittersweet chocolate

Heat the cream. Stir in the chocolate and continue heating and stirring until all of the chocolate is melted.

ganache

Éclairs: Assembly

Preheat the oven to 400 degrees.

Form small logs out of the Choux paste on a baking sheet. If you have a pastry bag with large tips, you can squeeze them out neatly. I do not, so I just formed the logs with a spoon and my fingers.

eclair shaping

These were about an inch across and 3 to 4 inches long.

Bake the pastries for 15 minutes at 400 degrees. Reduce the oven to 350 degrees and bake for another 10 to 30 minutes, depending on the size of the eclairs you are making.

When they are golden brown, turn the oven off. Poke a hole in the small end of the eclair and place them back in the oven for another 10 minutes to dry out. Remove the eclairs from the oven and let them cool a few minutes.

baked eclairs

For the topping, dip or dribble the eclairs in the chocolate ganache.

eclairs

To fill the eclairs, you can either use a pastry bag and squirt the pastry cream in through the drying hole as I did. Or you can slice the eclairs lengthwise and scoop the filling inside and place the top half back on top.

filling eclairs

There you have it: chocolate, creamy bliss.

The eclairs keep OK for a few days in the refrigerator in an air tight container, but they are not nearly as good as when they are first assembled. Take my advice: make all of the elements in the same session, bake them up and make a fresh pot of coffee, and enjoy them immediately. You won't be sorry!

tray of eclairs

Related Recipes: Pain Rapide au Chocolat, Brioche.

Eclairs

The Fresh Loaf
Pocket Book of Bread Baking

Now available for Kindle

When I tell people I am into bread baking, people often respond by telling me that they wish they could bake bread but it just seems too complicated. I find this discouraging, because baking a basic loaf of bread is about the easiest thing you can do in the kitchen. Once you understand what is going on in a simple loaf of bread you should be able to look at 90% of more difficult bread recipes and have a sense of what that loaf will taste and feel like.

Bread, at its core, is just four things:

Flour
Water
Yeast
Salt

That's it. There are even methods to cut out at least two more of those (yeast and salt), but the end product is unlikely to come out tasting like a typical loaf of bread.

Each ingredient and step in the process of making bread serves a distinct purpose. Once you understand what role each ingredient performs and what is occurring in each step of the process you will feel liberated to experiment and create your own recipes.

Understanding the Ingredients

  • Flour. There are a million different types of flour. Among them are those made from different grains, those made from different types of wheat, bleached and unbleached flour, enriched flour, blended flours, whole grain flours, and on and on. Don't let this intimidate you! Realize that your standard grocery store, All-Purpose Enriched Unbleached Flour that comes in a ten pound bag for under two bucks is good enough to produce an excellent loaf of bread. It is probably higher quality than the flour that 90% of bakers throughout history have ever gotten their hands on. Ok, you are unlikely to win the Coupe du Monde de la Boulangerie (The Bread Baker's World Cup) using it, but that isn't what most of us are aiming for.

    Flour forms the basis for your loaf of bread. No flour, no bread.

  • Water. You can probably find some of this around the house, can't you?

    Water activates the yeast and dissolves all of the other ingredients. Adding more water results is a stickier, flatter loaf with less regular holes in it, like a Ciabatta. Too little water restricts the expansion of the dough and results in a tight, dry, hard loaf.

  • Yeast. Once again, basic Instant Yeast (also known as Bread Machine Yeast) from the grocery store that comes in those little packets is good enough for all but the most elite baker.

    Active Dry Yeast, another kind commonly found in grocery stores, needs to be activated by pouring it in warm water prior to mixing it into the dough. So read the back of the packet before adding it to your mixture.

    Yeast is what causes the dough to rise. Adding more yeast will cause the loaf to rise more quickly. Adding too much yeast can cause a beery, off taste in your loaf. A teaspoon or two of yeast per loaf is typically called for.

  • Salt. Table salt works well enough. The kosher salt or sea salt that most grocery stores carry tastes a little better, but it isn't worth picking any up just for baking your first loaf: use whatever you've got in the house.

    Salt retards the yeast and helps control the fermentation process. It also adds flavor that most of us expect in even the simplest of breads.

These are the fundamental ingredients for making a decent loaf of bread. Additional ingredients add flavor or complexity to your bread. These will be discussed in a later article.

Once you understand the way these four principle ingredients function, you can look at any recipe and realize that the basic rules of how bread works don't change.

Understanding The Process

For a basic loaf, all you need to do is put the ingredients together in a large bowl, mix them together with a wooden spoon, and then knead the dough on a hard surface for approximately 10 minutes.

Kneading


before rising

Kneading is more than just stirring: kneading actually releases and aligns a protein in the flour called gluten. Gluten strands are what allow bread to form irregular pockets of carbon dioxide. Without this step your bread will have uniformly small holes, more like a muffin or loaf of banana bread.

As long as you aren't tearing or cutting the dough it is hard to go wrong with kneading. Squish and roll, squish and fold, applying a fair amount of pressure on the dough, is a basic kneading technique.

At some point, typically around seven or eight minutes into the process, the consistency of the dough will change. It'll become silky and smooth. You should feel it change. This is a good sign that you've kneaded enough. I typically give it another 2 or 3 minutes before calling it quits.

At this point, drop the dough into a bowl (it's helpful if the bowl is greased to keep your dough from sticking to the bottom - regular spray oil will usually do the trick) and throw a towel over the bowl, and leave it alone to let it rise.

Rising


after rising

Status check: by the time you are ready to let your loaf rise the yeast should be activated and the gluten should be aligned. The yeast does what any organism does after a long nap: it eats. The yeast feeds on the simple sugars that occur naturally in the flour. The yeast then releases carbon dioxide, which causes the bread to swell and form pockets.

If you have kneaded properly the dough will form long strands of gluten which allow large air pockets to form in your loaf. If not you will end up with numerous smaller holes. No holes in your dough means your yeast failed to activate.

The loaf must rise until it is approximately double in size. This typically takes from 45 minutes to a couple of hours, all depending on how much yeast the recipe called for. Temperature too is a factor: the warmer the room is the quicker the yeast will rise.

Punching Down and Shaping


shaped loaf

Some recipes call for one rise before shaping the loaf. Other recipes call for punching down the loaf to allow two or more rises. Punching down means simply to squish the risen dough down and re-knead it so that it is smaller again.

The purpose of punching down is to free up more food for the yeast. The longer the yeast feeds, the more complex the flavor of the loaf. Too many rises, however, can result in off flavors, such as bitterness and a beery flavor, to occur in your bread. As well as carbon dioxide yeast releases alcohol and acids. Too much acid in your loaf can actually cause the yeast to die off.

You do not shape the loaf until you are ready for the final rise. Either you place the loaf in a loaf pan or you shape it into a baguette, batard, round, or whatever shape you want. Then you give it another hour or so to double in size again.


scored loaf

Scoring the bread is just slicing it. You'll want to use something really sharp so that the dough doesn't fall and collapse again. A razor blade does the trick if you don't have fancy knives. The purpose of this is to release some of the trapped gases in your loaf so that it doesn't tear open while baking. It also makes your loaf look nice.

Baking

In the first five minutes in the oven your loaf will have one last growth spurt. This is called oven spring. Think of it as the yeast feeding itself quicker and quicker as it heats up until the rising temperature finally kills it off.


done

Many bakers use baking stones, which retain heat, to try to maximize the oven spring. This is helpful but not necessary when starting out.

Let's Make a Loaf!

OK, now that you have the basic idea, let's try it out with a really simple basic recipe. I tried this one today while stuck inside during an ice storm. This worked out well, since the freezing rain hit before we had realized that our refrigerator was lacking eggs and milk, along with a variety of other grocery items!

A Generic Recipe

3 cups flour
2 teaspoons salt
2 teaspoons yeast
1 1/8 cup water

Mix everything together. If it is too wet and won't come free from the sides of the bowl or keeps sticking to your hands, add a little more flour. If it is too dry and won't form into a ball, add a bit of water.

Knead it for 10 minutes. Cover and set it aside to rise until it doubles in size, approximately 90 minutes. Punch it down and let it rise again. Shape it, either by putting it in a greased loaf pan or by rolling it out into a long loaf and putting it on the back of a cookie sheet.


Ready to eat!

After it has risen to twice it size again, another hour or so, put the loaf into a preheated oven at 375 degrees. Let it bake for 45 minutes and then pull it out. If you made it into a long skinny loaf, it may cook 5 or 10 minutes quicker, so adjust the time based on what shape you chose. I baked the loaf in these photos for 40 minutes). 350-375°F for 45 minutes is typical for a loaf in a loaf pan.

Eat!

Wrap Up

Well, how was it? It may not be the best loaf of bread you've ever had, but it ain't bad.

There are many additional ingredients and techniques that are used in creating world class breads (some of which I will talk about in future articles), and each step of the process that we discussed (kneading, rising, shaping, scoring, baking) can be further elaborated on, but the approach used in this recipe is at the core of almost every other recipe you will encounter.

Continue to Lesson Two: Adding Something More to Your Loaf.

Your First Loaf - A Primer for the New Baker

Alchemist Aotearoa's picture
Alchemist Aotearoa

A Latvian-style Sourdough Rye Bread

Greetings from Aotearoa New Zealand. I've been making bread for about six months now. Back in March my cousin gave me a sourdough starter and a recipe for a white wheat sourdough loaf with a bit of rye, and that got me hooked. My mother is from Latvia, and I remember the marvellous "black bread" that the old ladies at the Latvian Society used to make when I was growing up in the 1970s. Wanting to recreate the taste I remembered, I searched for Latvian recipes, and that led me to this site and then to Stanley Ginsberg's blog and book "The Rye Baker." Being a purist, I wanted something that used only the sourdough as the leavening, without commercial yeast. After trying two or three of his recipes, I started experimenting with my own variations, and came up with this formula. To my mind at least, it's a complex and nuanced balance of flavours - a background of malt, a definite but not overwhelming overlay of carraway (that was always a feature of the breads I remember from my childhood), an unmistakable tang of sour, and the sweetness that makes me want to keep going back for more. 

I'd intended this to be the perfect loaf to photograph for this forum, but by mistake I used ordinary greaseproof paper to line the tin instead of baking paper, and it stuck irremovably to the crust - you can see it in the photo. But I decided to post it anyway. The taste is fine - you just have to trim off the crusts.

(SCROLL DOWN to the bottom of the comments for the latest iteration of the recipe)

Recipe page 1

Recipe page 2

Fully proved loaf

Recipe page 3

HKbreadwinner's picture
HKbreadwinner

Sourdough Bulk Fermentation

Hi Esteemed Bakers,

I have yet another question in my eternal quest for that wildly open crumb (thanks by the way for everyone's super helpful insights in the past).  So this time's question is bulk fermentation. Whether it's Trevor or Tartine's literature, they both generally say to let the dough rise 20-30%, and am wondering for those of you who are able to achieve that wildly open crumb, if you adhere to that.  I'm always tempted to let it rise more thinking that the gas bubbles would get bigger.  But I stick with about 30% with very inconsistent results.  I understand shaping could be an issue as I struggle with it sometimes.  overnight retardation shouldn't really be a factor?  My fridge is at about 3C and I retard the loaves for about 12 hours.  Thanks!

swissbake's picture
swissbake

What are Flour Types T45, T55, T65, T150, Type 0 or Type 00, Magic Enzy Flour, Rye Flour T1150, Pizza Flour?

Swiss Bake French style flours are traditionally milled by artisan millers and the entire flour range is produced from imported French grown wheat or with a blend of locally grown equivalent wheat varieties.

These quality flours from us are a result of our dedication and passion for well-crafted flour.  Each year we produce only a limited quantity of each refined flour on order estimates from our most demanding chefs and bakers.


French classification for flour is based on the resulting amount of residue after processing 10 kg of flour in a 600º C furnace. T45 or Type 45 is the lowest and whitest flour with only around 45 grams of mineral contents left after the burning process and no part of the bran (outer enveloping shell of the grain) remaining. Similarly, T150 has around 150 grams of mineral contents and is considered as whole-wheat flour due to high bran leftover.


  • T45 Swiss-Bake French Style Flour, 25kg bag

Soft Wheat, White Fine flour for cakes


Pure French style flour, perfect for making high quality cakes and sweets. It is fine, soft and white in colour. It is very light in texture and has very little mineral content. T45 is finely ground flour using the soft wheat varieties.

It is not suitable for bread but is typically used for brioche and sometimes for croissants. T45 refers to the amount of mineral content that is left after burning the flour i.e. T45 has 0.45% mineral content.


T45 flour is equivalent to Type 00 Italian flour, Euro 450 flour type and American Cake flour.


Mineral Content : 0.40% – 0.45%   

Protein Content  : 8.50% – 9.50%


Key Ingredients: 100% milled soft wheat

Swiss-Bake French style T45 flour is neither bleached nor chlorinated.


Hard Wheat White flour for baking


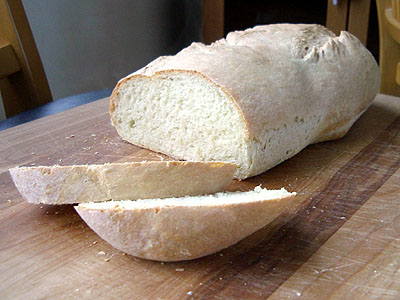
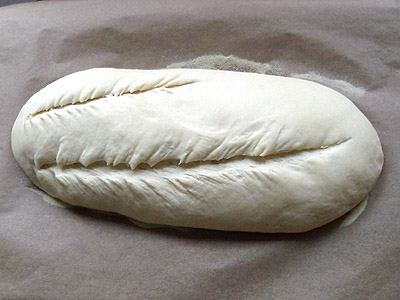
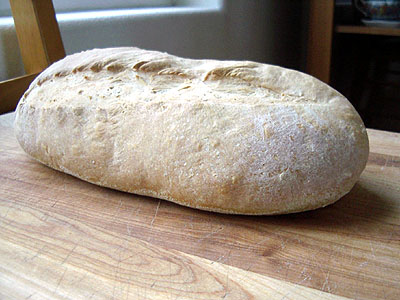
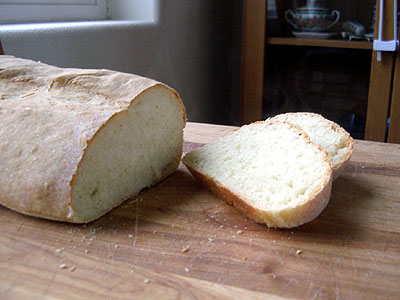
Strong French style White Bread Flour; type T55 is ideal for making bread, puff pastries, croissants and baguettes. This type of flour is best known for making croissants. This Flour gives a light open textured loaf with a crisp crust. It is medium in protein content, and when this protein is mixed with water it forms gluten. Traditional French bread is made with only flour, yeast and water. That’s the reason why good quality flour is a must.


The 55 refers to the amount of mineral content that is left after burning the flour i.e. T55 has about 0.55% mineral content.


T55 flour is equivalent to Type 0 Italian flour, Euro 550 flour type and American all purpose flour.


Mineral Content : 0.50% – 0.55%   

Protein Content  : 11.0% – 12.0%


Key Ingredients: Wheat Flour, Wheat Gluten, Malted Wheat flour, Cereal Amylase

Swiss-Bake French style T55 flour is non-fortified, unbleached and non-bromated


Extra Strong Bread flour for little dark breads


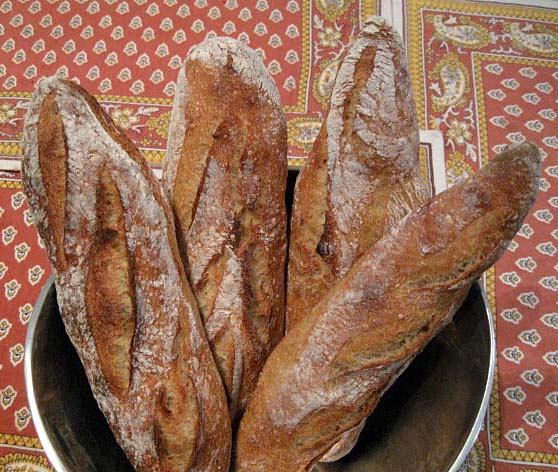
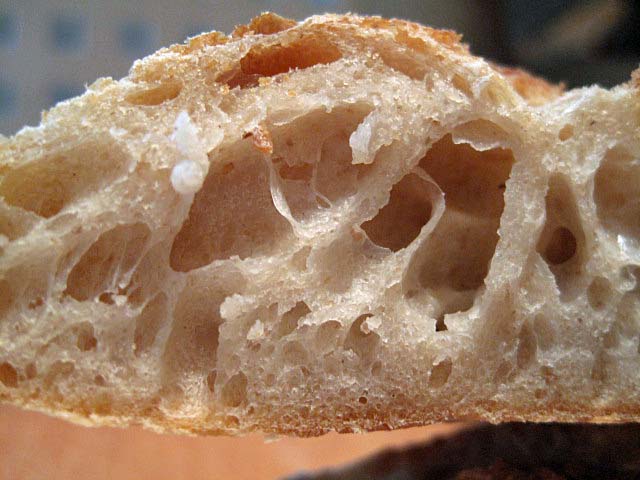
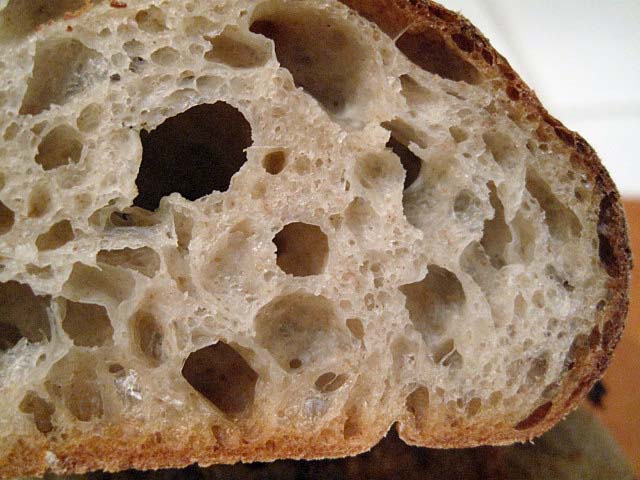
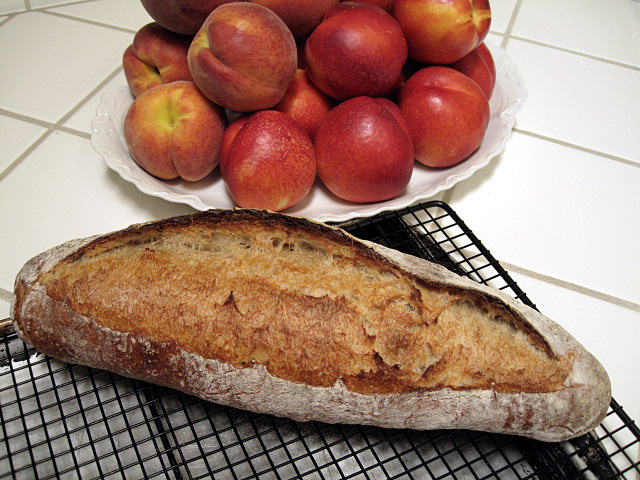
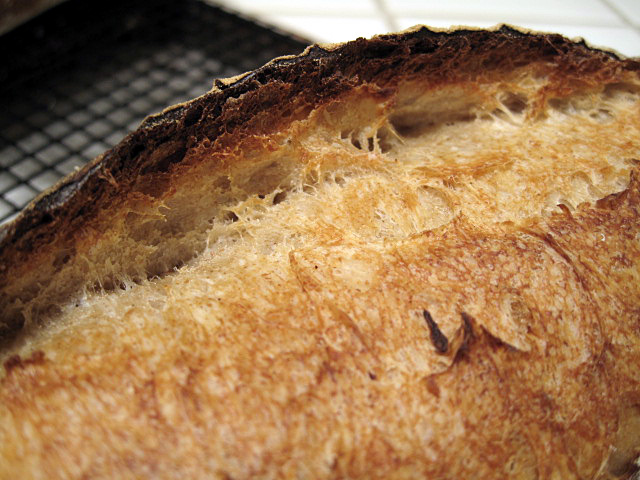
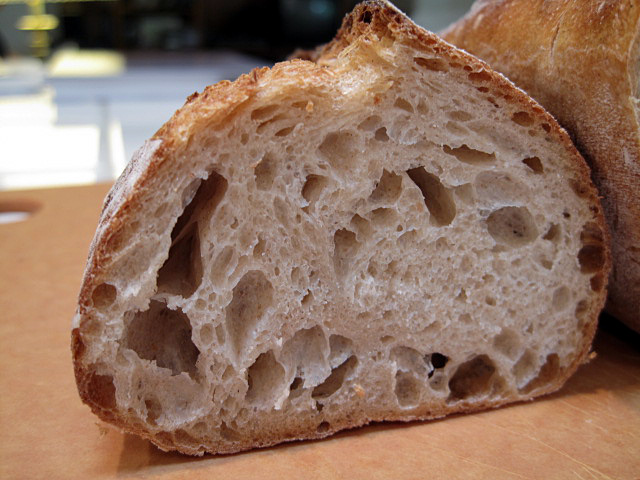
Strong French style little coarse Bread Flour; type T65 is ideal for making baguettes and artisan dark breads. This type of flour is best known for making baguettes. This flour gives a light open textured loaf with a crisp crust. It is high in protein content and has phenomenal fermentation tolerance.


The 65 refers to the amount of mineral content that is left after burning the flour i.e. T65 has about 0.65% mineral content.


T65 flour is equivalent to Type 1 Italian flour, Euro 650 flour type and high gluten bread flour.


Mineral Content : 0.60% – 0.65%   

Protein Content  : 12.0% – 13.5%


Key Ingredients: Wheat Flour, Wheat Gluten, Malted Wheat flour, Cereal Amylase

Swiss-Bake French style T65 flour is non-fortified, unbleached and non-bromated


T150 Swiss-Bake French Style Flour, 25kg bag

Coarse ground wholemeal flour for baking


Wholemeal French style coarse Flour; type T150 is ideal for making whole wheat, high fibre artisan breads and baguettes. This type of flour is best suited for all your whole wheat baking needs. This flour gives a brown textured loaf with a crisp crust. It is high in mineral content & protein and gives a nice wholemeal aroma.  This wholesome flour gives nutrition, texture and flavour of wholemeal (including bran & germ)to everything that you bake with it.


The 150 refers to the amount of mineral content that is left after burning the flour i.e. T150 has about 1.50% mineral content.


T150 flour is equivalent to Type 2 Italian flour, Euro 1150 flour type and whole meal bread flour.


Mineral Content : 1.25% – 1.50%   

Protein Content  : 12.0% – 13.5%


Key Ingredients: Whole Wheat Flour, Wheat Gluten, Malted Wheat flour, Cereal Amylase

Swiss-Bake French style T65 flour is non-fortified, unbleached and non-bromated


Perfect Pizza flour


Perfect Pizza flour made using custom blend of durum and all-purpose flour along with dough conditioners and functional enzymes. It is fine milled flour with higher protein content for a perfect crust. This flour shows outstanding fermentation tolerance, good water absorption and improved strechibility strength. The dough is easy to shape and gives crispiness to the baked crust.


Swiss-Bake Pizza flour is equivalent to Type 00 Italian flour and other imported Pizza flour.


Mineral Content : 0.45% – 0.50%   

Protein Content  : 11.0% – 12%


Key Ingredients: Wheat Flour, Dough Conditioners, Malted Wheat flour, Cereal Amylase, Salt


Swiss-Bake Pizza flour is non-fortified, unbleached and non-bromated.


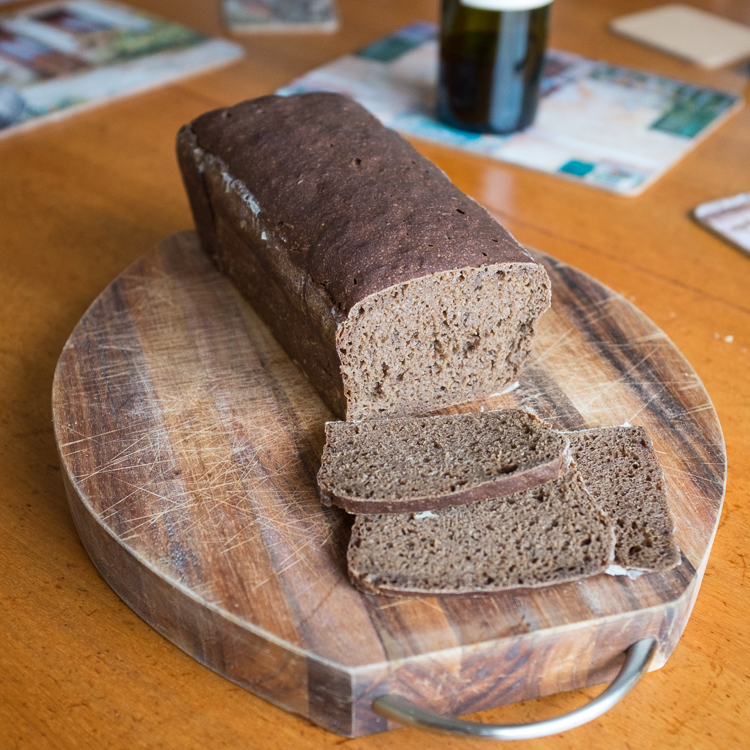
Our Rye Flour gives a dense and dark texture with full rye flavour. This flour can be used in combination with refined wheat flour to make varieties of rye sandwich breads and other artisan rye breads.

Rye Flour Type 1150


This dark medium granulation flour is milled from imported German rye grains and grits. It is slightly dark and milled closer to bran than the endosperm. It gives a dense and dark texture with full rye flavour (slightly sour). This flour can be used in combination with refined wheat flour to make varieties of rye sandwich breads and other artisan rye breads.


Rye Flour Type 1150 is equivalent to a medium to dark rye flour.


Mineral Content : 1.25% – 1.35%   

Protein Content  : 8.0% – 9.0%


Key Ingredients: 100% Rye flour


Swiss-Bake Rye flour is non-fortified, unbleached and non-bromated.
Keywords: Rye flour, German Flour, dark Flour, American Rye, Rye Bread Bakery ingredients, Pumpernickel

————————————————————————————————————

drogon's picture
drogon

Easy Sourdough - Part 1

Decided to do another easy sourdough post - did one a while back on my own site, but after some discussion here where I posted a recipe which the person who started that thread had a bit of a disaster with, decided to give it a go with photos as I went.

So... Sourdough - I do not think there is any magic to it. I see and read many articles on how you need to look after the starter, nurture it like a child or pet, feed it, and so on. Continuing on, I see techniques for "building the starter" - extra feeds and discards at fixed time and temperature intervals, then continuing on, kneading, wetting, stretching, folding with again, more regimented intervals before shaping, proofing, scoring to a set of rules and baking it using a dutch oven, cloche, baking stone, etc. before leaving it 6 hours to cool and fully set before daring to take a knife to your item of beauty that you've sweated blood and tears over...

Here's my take; It's just bread. Get over it and just do it.

Sure - you can apply rules, you can take far more care with it that I appear to do, you can regiment the process and create rules - if what you're after is something extra special. The one loaf a week you make and you want to take pride in it and make sure its the best there is. And that's fine. I'm making basic daily sourdough bread here and for that, there is nothing special. No tricky processes, no strict timings or (within reason) temperatures.

OK - The starter. This will take you a week or so to get going from scratch and make sure it's working for you. My starters are well established and they live in the fridge. I have separate wheat and spelt (made with white flour, kept at 100% hydration) and rye (made with whatever rye I have to hand and kept at 150% hydration). I take them out of the fridge, use some directly from the jar, or use some from the jar into a bowl when I add more flour & water to make a "production" starter. Some days I need 3Kg of starter, so I have no choice...

Last night I needed 150g, so I used some directly from the jar. The jar was then topped up (75g flour, 75g water) and left in the bakehouse while I prepared the dough then put in the fridge.

This is the recipe for my Buckfastleigh Sourdough. It's a daily bread which I bake five days a week and make and sell about 25 of them a week in local shops.

  • 100g stoneground wholemeal flour (organic; Marriages)
  • 400g strong white flour (organic; Shipton Mill No. 4)
  • 150g starter at 100% hydration
  • 285g water
  • 8g salt

It's Sunday evening about 9pm.

I used the starter from the jar out of the fridge. If I didn't have enough, then I'd have started with 30g starter from the fridge, added 60g flour and 60g water and left it for a few hours.

This is the dry stuff in the mixing bowl. I just separated them so you could see - wholemeal on the right, white on the left and salt in the middle. (500g flour + 8g salt) Mix these up and measure out the starter:

Add the water:

Maybe not exactly 285g but close enough. The water was directly out of the tap - my water here is chlorinated but that's fine. It was a little chilled so I added some hot to it (from the tap) I didn't check the temperature, but it felt slightly warm. (Oh look, the starter isn't floating, oh well)

Mix that up and tip it onto the bench and push it about a little more to make sure it's properly mixed and use a scraper to pull it into one shaggy blob:

This is then left, covered with the bowl for 30 minutes. Note: No kneading has happened yet.

Lets not forget the starter, so stick the jar on the scales, zero the scales and add 75g flour:

and water:

This was then stirred up and I left it in the relative warmth of the bakehouse for the next hour just to let it warm up a little to let the yeasty beasties get to know their new food source and start to get to work before I put it back in the fridge. (Incidentally, I'm making this on Sunday evening and the last time the starter was used was on Friday afternoon when I used some to create the 3Kg I needed for the Friday night knead)

Half an hour later, I take the bowl off the shaggy lump, use the scraper to tease it out to a longer "log" then knead it for about 30 seconds. Yes, 30 seconds - it's a push away with my thumbs, then roll back with fingers operation. It takes 3 or 4 of these to turn the vertical sausage into a horizontal one. I pick this up, turn it 90° and do it again. I do it 3 times in total then chaff it into a boulle shape then plonk it back into the bowl. This really did only take 30 seconds.

I stuck the thermometer into it so you could see.

That's taken less than 45 minutes with a big half hour gap in the middle. Low impact, very easy to do. I then covered it with a shower cap and left it in a (relatively) cool place in the downstairs kitchen - which was at about 18°C.

I split this into two blog entries just to keep the size and loading time down - on to part 2!

-Gordon

dmsnyder's picture
dmsnyder

San Joaquin Sourdough, updated


The "San Joaquin Sourdough" is my own recipe. It evolved through multiple iterations from Anis Bouabsa's formula for baguettes. Most of my deviations developed in discussion on TFL with Janedo, who first suggested adding sourdough starter and rye, and, then, leaving out the baker's yeast and making it as a "pure" pain au levain.

I have tried many modifications of ingredients and procedures. The current formula uses the ingredients specified below.

Those who have followed the evolution of this bread will note that I have increased the levain from 20 to 30 (baker's) percent. I have also switched from a 75% hydration levain to a 100% hydration levain, reducing the water added to the dough to keep the overall dough hydration about the same.

Originally, all gluten development was by the “stretch and fold in the bowl” method. I have added a couple folds on the board and lengthened the bulk fermentation prior to cold retarding the dough.

These changes result in a somewhat tangier bread. I don't think they have changed the crust or crumb structure noticeably.

I made two other modifications of my procedures for today's bake: First, I employed the oven steaming method recommended for home bakers by The San Francisco Baking Institute.

The oven is not pre-steamed (before loading the loaves). A cast iron skillet filled with steel pieces (nuts and bolts, rebar pieces) is pre-heated in the oven along with two baking stones. One stone is placed on a rack above the stone and rack on which the loaves will be loaded. When the loaves are loaded, a perforated pie tin filled with ice cubes is set atop the skillet. As the ice melts, water drips through the perforations and turns to steam when it hits the metal pieces.

I deviated from the SFBI-prescribed method in two particulars: I used only a single baking stone, and my cast iron skillet was filled with lava rocks rather than steel pieces.

My second procedure modification was to open the oven door for a few seconds every 5 minutes during the final 15 minutes of the bake. This was to “vent” the steam rising from the loaves themselves in the hope this would result in a crust that stays crisp longer. It did result in less softening of the crust as the bread cooled. Methods to vent the oven and dry the crust during the last part of the bake warrant further exploration.


Ingredients


Active starter (100% hydration)

150 gms

KAF All Purpose flour

450 gms

BRM Dark Rye flour

50 gms

Water

360 gms

Sea Salt

10 gms


Procedures

Mixing In a large bowl, mix the active starter with the water to dissolve it. Add the flours and stir to form a shaggy mass. Cover tightly and let rest (autolyse) for 20-60 minutes.

Sprinkle the salt over the dough. Using a plastic scraper or silicon spatula, stretch and fold the dough 30 times, rotating the bowl 1/5 turn between each stroke. Cover tightly. Repeat this stretch and fold procedure 3 times more at 30 minute intervals.

Fermentation After the last series of stretches and folds, scape the dough into a lightly oiled 2 quart/2 liter container and cover tightly. (I use a 2 quart glass measuring pitcher with a tightly fitting plastic lid manufactured by Anchor Glass.) Ferment at room temperature for 90 minutes with a stretch and fold after 45 minutes, then place in the refrigerator and leave it there for 21 hours.

Dividing and Shaping  Take the dough out of the refrigerator and scrape it gently onto a lightly floured work surface. Gently pat it into a rectangle. Divide as desired or leave in one piece. To pre-shape for a bâtard, fold the near edge up just past the center of the dough and seal the edge by gently pressing the two layers together with the ulnar (little finger) edge of your hand or the heel of your hand, whichever works best for you. Then, bring the far edge of the dough gently just over the sealed edge and seal the new seam as described.

Cover the dough with plastic wrap and/or a kitchen towel and let it rest for about 60 minutes, with the seams facing up. (The time will depend on ambient temperature and how active your starter is. The dough should have risen slightly, but not much.)

To shape a bâtard, fold the near edge of the dough and seal the edge, as before. Now, take the far edge of the dough and bring it towards you all the way to the work surface and seal the seam with the heel of your hand. Rotate the loaf gently toward you 1/4 turn so the last seam you formed is against the work surface and roll the loaf back and forth, with minimal downward pressure, to further seal the seam. Then, with the palms of both hands resting softly on the loaf, roll it back and forth to shape a bâtard. Start with both hands in the middle of the loaf and move them outward as you roll the loaf, slightly increasing the pressure as you move outward, so the bâtard ends up with the middle highest and the ends pointed .

Preheating the oven One hour before baking, place a baking stone on the middle rack and put your steaming apparatus of choice in place. Heat the oven to 500F.

Proofing After shaping the loaf, transfer it to parchment paper liberally dusted with semolina or a linen couche. Cover the loaf with plastic wrap and a kitchen towel or a fold of the linen. Proof until the loaf has expanded to about 1-1/2 times it's original size. (30-45 minutes) Do not over-proof, if you want good oven-spring and bloom!

Baking Pre-steam the oven, if desired.

Slip a peel or cookie sheet under the parchment paper holding the loaf or transfer to a peel, if you used a couche. Score the loaf. (For a bâtard, hold the blade at about a 30 degree angle to the surface of the loaf. Make one swift end-to-end cut, about 1/2 inch deep.)

Transfer the loaf (and parchment paper, if used) to the baking stone. Steam the oven. Turn the oven down to 460F.

After 12-15 minutes, remove the loaf pan and your steaming apparatus from the oven. Rotate the loaf 180 degrees, if it is browning unevenly. Close the oven door.

Bake for another 12-15 minutes, then remove the loaf and place on a cooling rack. Check for doneness. (Nice crust color. Internal temperature of at least 205F. Hollow sound when you thump the bottom of the loaf.) If necessary, return to loaf to the oven to bake longer.

Cooling Cool on a rack for two hours before slicing.


David

Submitted to YeastSpotting


dmsnyder's picture
dmsnyder

San Joaquin Sourdough

The "San Joaquin Sourdough" is my own recipe. It evolved through multiple iterations from Anis Bouabsa's formula for baguettes. Most of my deviations developed in discussion here on TFL with Janedo, who first suggested adding sourdough starter and rye, and, then, leaving out the baker's yeast and making it as a "pure" pain au levain.

I got a pretty nice ear and grigne on this one.


Ingredients


Active starter (67% hydration)

100 gms

KAF European Artisan-style flour

450 gms

Giusto's whole rye flour

50 gms

Water

370 gms

Salt

10 gms

Note: Whole Wheat flour or White Whole Wheat flour may be substituted for the Whole Rye. Each results in a noticeable difference in flavor. All are good, but you may find you prefer one over the others.


Procedures


Mixing

In a large bowl, mix the active starter with the water to dissolve it. Add the flours and stir to form a shaggy mass. Cover tightly and let rest (autolyse) for 30 minutes.

Sprinkle the salt over the dough. Using the plastic scraper, stretch and fold the dough 30 times, rotating the bowl 1/5 turn between each stroke. Cover tightly. Repeat this stretch and fold procedure 3 times more at 30 minute intervals. 


Fermentation

After the last series of stretches and folds, scape the dough into a lightly oiled 2 quart/2 liter container and cover tightly. (I use a 2 quart glass measuring pitcher with a tightly fitting plastic lid manufactured by Anchor Glass.) Ferment at room temperature for an hour, then place in the refrigerator and leave it there for 21 hours. (In this time, my dough doubles in volume and is full of bubbles. YMMV.)


Dividing and Shaping

Take the dough out of the refrigerator and scrape it gently onto a lightly floured work surface. Gently pat it into a rectangle. Divide as desired or leave in one piece to make a 980 gm loaf. To pre-shape for a bâtard, fold the near edge up just past the center of the dough and seal the edge by gently pressing the two layers together with the ulnar (little finger) edge of your hand or the heel of your hand, whichever works best for you. Then, bring the far edge of the dough gently just over the sealed edge and seal the new seam as described.

Cover the dough with plastic wrap and/or a kitchen towel and let it rest for 30-60 minutes, with the seams facing up. (The time will depend on ambient temperature and how active your starter is. The dough should have risen slightly, but not much.)

To shape a bâtard, fold the near edge of the dough and seal the edge, as before. Now, take the far edge of the dough and bring it towards you all the way to the work surface and seal the seam with the heel of your hand. Rotate the loaf gently toward you 1/4 turn so the last seam you formed is against the work surface and roll the loaf back and forth, with minimal downward pressure, to further seal the seam. Then, with the palms of both hands resting softly on the loaf, roll it back and forth to shape a bâtard. Start with both hands in the middle of the loaf and move them outward as you roll the loaf, slightly increasing the pressure as you move outward, so the bâtard ends up with the middle highest and the ends pointed .


Preheating the oven

One hour before baking, place a baking stone on the middle rack and both a cast iron skillet (Mine is filled with lava rocks.) and a metal loaf pan (or equivalent receptacles of your choosing) on the bottom shelf. Heat the oven to 500F. Put a kettle of water to boil 10 minutes before baking.


Proofing

After shaping the loaf, transfer it to parchment paper liberally dusted with semolina or a linen couche, liberally dusted with flour. Cover the loaf with plastic wrap and a kitchen towel or a fold of the linen. Proof until the loaf has expanded to about 1-1/2 times it's original size. (30-45 minutes) Do not over-proof, if you want good oven-spring and bloom!


Baking

Put about a cup full of ice cubes in the loaf pan on the bottom shelf of the oven and close the door.

Slip a peel or cookie sheet under the parchment paper holding the loaf or transfer to a peel, if you used a couche. Score the loaf. (For a bâtard, hold the blade at about a 30 degree angle to the surface of the loaf. Make one swift end-to-end cut, about 1/2 inch deep.)

Transfer the loaf and parchment paper to the baking stone, pour one cup of boiling water into the skillet, and close the oven door. Turn the oven down to 460F.

After 12-15 minutes, remove the loaf pan and the skillet from the oven. Rotate the loaf 180 degrees, if it is browning unevenly. Close the oven door.

Bake for another 12-15 minutes, then remove the loaf and place on a cooling rack. Check for doneness. (Nice crust color. Internal temperature of at least 205F. Hollow sound when you thump the bottom of the loaf.) If necessary, return to loaf to the oven to bake longer.

When the loaf is done, leave it on the baking stone with the oven turned off and the door ajar for 5-10 minutes to dry and crisp up the crust.


Cooling

Cool on a rack for two hours before slicing.

Enjoy!

David


Submitted to Wild Yeast Spotting on Wildyeastblog

Pages