September 16, 2007 - 11:48am

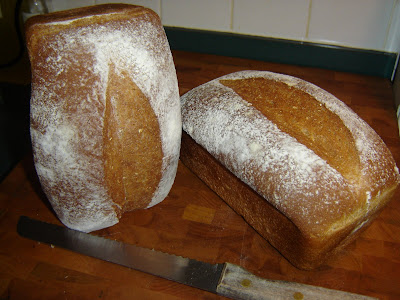
Sourdough Oatmeal Bread
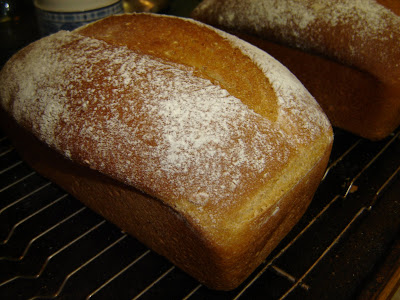
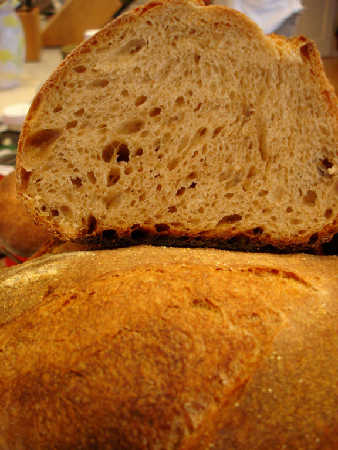
Here's my new sandwich loaf...Bernard Clayton's Sourdough Oatmeal Bread. It is a very good bread for everyday use. Thought I would share it with you.

-Chad
Share
Here's my new sandwich loaf...Bernard Clayton's Sourdough Oatmeal Bread. It is a very good bread for everyday use. Thought I would share it with you.
-Chad


Hi Mariana, and of course to anyone else that wants to join in…the more the merrier!
I must say that I've tried many pizza dough recipes in the past but I think I've finished looking for the best – I found it. Again Rose shines, and it is her " Perfect pizza dough" recipe on pg 189 in the Bread Bible. I used to get left over crusts all the time, but not any more. The all purpose flour and light handed mixing keep it very tender, and also very easy to make. The kids sometimes eat it cold and they still finish the crusts.
I always let the dough rest overnight in the fridge, and since it is so hot in the summer I put it straight away in the fridge right after mixing without waiting the 30 min. as per instructions.
As for tinkering…the first time I made it as written and hubby said he thought it was a bit too salty, so I cut that a bit, then I figured I could cut the sugar as well, and in the summer I cut down on the yeast too. Sometimes I use wwflour in place of a portion of the all purpose. So in the end this is quite a deviation from the original but as I said before I really think the tender texture comes from the AP flour and very little mixing, and doesn't really have so much to do with the exact recipe. For this to feed 6 people, and some of us have a big pizza appetite, I multiply the recipe by 5.
Instead of measuring the oil, I just coat the inside of the rising container with olive oil making sure to cover the dough as well.
When it has risen I divide the dough and round each piece coating slightly with the oil and put them straight away on baking parchment. Now I know it's not professional, but I roll out the dough – the flinging in the air stuff doesn't work for me, and just flattening out with my hands makes the crust too thick, so I roll, rest, roll, rest, roll etc on the paper, until it is thin enough, . Then let the dough rise until it is puffy. In winter it takes about 45 min- 1 hr, in summer about 30 min.
Then go on the sauce and toppings and cheese. Everyone has their favourites but I don't cook the tomato sauce and most of the toppings (like onions, mushrooms) are raw, but sliced very thinly.
Now for the interesting part – the oven. I really love my oven (Scholtes – it's a French make). I got it a few years ago because it had a special program for baking yeast dough that keeps the oven very moist, and uses more bottom heat than top to allow the dough to continue rising during oven spring. There are also many automatic programs and one of them is for pizza. So here goes : this gives me a fully baked large pizza in 4 minutes. With a bit of monitoring I'm sure it can be done with most modern ovens. First of all preheat the pizza / baking stone on the rack on the second to the highest position in your oven. Since this is an automatic program, the oven doesn't state the temp but I'm sure it's very hot. Then slide the pizza with the baking paper onto the stone and bake for 3 min. (After the first 1 - 2 min. you can remove the paper if you like.) Then switch the oven setting to "broil" and stay close by, as this will take only about 1 min before it's ready. After removing the pizza, give the oven a few minutes to reheat before baking the next one. The timing works out well, so we usually just finish eating one by the time the next one is ready.
So that's my pizza story. Please feel free to ask about anything that isn't clear. Enjoy your pizzas everyone!
Please excuse my computer...I wrote this in 'word' and then copied and pasted it here, but obviously the hebrew default setting is effecting the way it comes out and everything is lined up on the wrong side. Sorry about that -hope you can still understand it. (ed. note: I fixed it for you)

Today, besides Challah I produced two loaves of Reinhart's multi-grain Struan from his new book. For the "grains" part I used about 1/3 cooked brown rice, and the reset rolled oats. For the liquid is used yoghurt.
 Reinhart's WGB multi-grain Struan
Took quite a while longer to bake than I thought it would, but tastes great. I did score a little too deep, and combined with oven spring, made the loaves spill over the side of the loaf pan just a little. Taste, luckily is not affected!
 Reinhart WGB: Multi-grain Struan crumb
It looks like the left side is not cooked, but it was. This was a side effect of my camera using a large lens opening, and thus having a very shallow depth of field.
--dolf
Today I baked a traditional (i.e. round) Challah for the new year's celebration.
 Round Holiday Challah
Certainly not my best ever, but it'll do!
--dolf

I've posted a spreadsheet that summarizes what I do these days to analyze rise times and to dissect recipes or design my own variations. Below is some discussion and also some instructions for the spreadsheet. Use it as is, and modify it as you like. It may contain errors, bugs, and it is not carefully designed to work on all computers and operating systems. It uses "macros", which you have to enable, and it probably will only work with relatively recent versions of Excel that would be available in Microsoft Office 2003 or later. I notice that I can use the spreadsheet on a Macbook with Microsoft Office 2004 for Mac installed on it.
I've built some models of fermentation rates and rise times over the last few years. There is no science here, just trial and error in an attempt to engineer an admittedly crude but hopefully useful model based partly on observations and partly on what little I can gather from some scientific papers and a few baking books. You can beat me up if you want with general treatises on all the ways this doesn't make sense or can't possibly work or is theoretically completely incorrect. I already am well aware I'm skating on thin ice (or possibly am in a coma under the ice already) in any sort of rigorous intellectual or scientific sense. However, if you want to make some specific constructive suggestions or point out neat ways to get a good handle on this or that factor or places where you think the model gives wrong answers and what should be the right answer, that would be interesting.
I thought it might be worth tossing out this basic approach for how to get a handle on rise times vs. inoculation, salt, temperature, or other factors. I also did some tests on low and high hydration doughs, but I'm not describing that in the simpler approach below.
I went down some fairly lengthy testing roads and built a whole somewhat extensive spreadsheet to model rise time and fermentation time with a few more factors than indicated below in it, but a simpler, and fairly practical approach would be something like:
First make sure your starter is fully vibrant and well refreshed, and make enough to go into these test doughs.
Make up 4 small doughs using a "typical blend" of flour you might most often use. You can guess adjustments for different flours, but it's nice to do this with the flour you will tend to be using most. Make the doughs with about 200g of total flour each as follows. Use 75% hydration, which will make somewhat wet easily worked doughs. In two of the doughs, use 4% inoculation (fermented flour as a percent of total flour), one with no salt, one with 2% salt. In the other two, use 16% inoculation, one with no salt, one with 2% salt.
Try to work all the doughs exactly the same way and for the same amount of time, so the gluten development is about the same. Set them to rise in containers that allow you to determine the time it takes them to double in volume. Remember to carefully label them with the initial time and the volume level they had initially.
When they double in volume note the time, shape them into little loaves and monitor them to see when they proof. Note that time also for each dough. Bake each one when it is ready all using the same temperature if possible.
You can then use the times you get for doubling and proofing of these test doughs when you make other recipes. The total mix to bake time should be the same, whether you shape much earlier or shape closer to when the dough has doubled. Also, the fermentation times should be the same (adjusted for inoculation and salt) for other recipes, regardless of whether you deflate the dough during "folds" or do other handling techniques that may make it difficult to tell when a dough has really risen.
The difference in time to double the volume for an inoculation of 4% vs. 16% will give you an idea of how much time 2 doublings of the population of your starter takes at the temperature you used. The rise times should be roughly logarithmic with respect to inoculation, since bacterial population growth is roughly exponential during most of the bulk fermentation. An inoculation of 8% should take 1/2 of that difference in time less time to rise than the 4% inoculation and 1/2 of that difference more time to rise than the 16% inoculation. You should notice that the salted ones ferment more slowly, so you can adjust for salted vs. unsalted with the information from your test doughs. Unsalted is useful for knowing how long a levain should ripen.
Note that I don't include a 32% inoculation, which maybe should take one generation time less than the 16% inoculation. It seems to me that it doesn't work that way because 32% inoculation with a ripe levain leads to early gluten deterioration or maybe early slowing of the fermentation rate, so a dough rises more slowly than you would think, given the large inoculation. In the model I built, adjustments are made to try to account for slower rises at higher inoculations.
Adjusting for temperature is not so easy, since it gets crazy if you try to run all kinds of tests at different temperatures. I just use the models in a Ganzle paper I have that describe the growth rate as a function of temperature for L. sf and C. milleri. You can adjust the rise times to reflect the relative activity rate at a different temperature from the one you used in your tests. The time should just be inversely proportional to the growth rate.
Finally, as you start to play with more and different test doughs, you'll notice that sometimes rise times don't seem to make sense, and usually I've narrowed it down to differences in gluten quality for different doughs. For example, I've made little test doughs at very low hydration with salt. The gluten becomes incredibly stiff in a small test dough, and it just won't rise. You know the fermentation has to be ongoing, yet the volume increase is not there.
Now, what I actually did was a lot more test doughs than the ones above. I made some rough assumptions, like that the growth rate in doughs is exponential during most of the bulk fermentation, and that the dough is doubled and then proofed when the organisms reach a certain population concentration relative to the initial population concentration in a ripe starter. I'm also assuming that factors such as salt and hydration have a simple multiplicative effect on the growth rate and that the relative growth rates follow the temperature curves in a paper by Ganzle about modelling sourdough organism growth rates. The last thing I did was try to make a model of "gluten quality", which is a function of salt, inoculation percentage, and hydration. The idea is that a very stiff or very loose dough will rise less than a dough somewhere in the middle. All of this is summarized in a spreadsheet I built that tries to set all the model parameters in such a way as to minimize the difference in rise time estimates of model vs. experiment on a large number of different test doughs.
OK, it's a little crazy, I am the first to admit. However, I've found myself doing better breads and able to design my own recipes with it, since I'm not tied to just the observed condition of the dough itself, which may vary a great deal from one recipe to another and is hard for one baker to describe to another. Instead, I have a pretty good idea how long the fermentation should take for my starter, my temperatures, and the recipe inoculations, salt, and hydrations, so I can ferment and proof more according to "the clock". It doesn't mean I don't adjust according to feel and observation of the dough itself, but it seems to help a great deal to have the model's estimates of the right times in mind as I do that, in case there is something misleading about the observations or the feel of a new recipe.
The spreadsheet I'm including has blue cells that are the inputs. There are graphs of various functions used to generate the adjustments to the growth rates of the organisms in the culture. The main inputs are the inoculation, which is the percentage of flour that is coming from a preferment in the total flour in the dough. So if there is a levain with 100g of flour and 100g of water, and the total flour in the dough is 1Kg (900g of additional flour), then the inoculation would be 10%. The salt and hydration are percentages of the total flour in the dough. So, in the example above, if the levain has 100g of flour and 100g of water, and you add 900g of flour to the levain along with 600g of water and 20g of salt, the salt is 2% and the hydration of the dough is 70% (100g water in levain + 600g water added to the dough = 700g in 1Kg of total flour in the dough is 70%).
The "bread calc" tab on the spreadsheet is a general hearth bread recipe that can be changed to match many different hearth breads. You can use it to duplicate a recipe in a book to understand the rise times and see the percentages of ingredients in a consistent format. You can also use it to design your own recipes or make small changes such as scaling the recipe to a different amount, adjusting the amounts of preferment, types of flours, hydration, and so on, to suit your needs.
Instructions
Here's some stuff to help figure out how to use the spreadsheet for calculating rise times and hearth bread recipes. If you read this step by step, it should help a lot. However, I admit it's long and may take a while to get through. Sorry, I don't know an easy way around it.
First of all, you have to "enable macros", so that the software I wrote will run inside excel. You do that by going to "Tools", then opening the "Macro" dragdown menu, then "Security..." , and finally set the "security level" to "medium". You then have to close Excel and open it again. When you do open the Excel file, it will bring up a dialog box that asks you to decide whether to "enable macros" or not. You should click on the button labeled "Enable Macros".
Once that is done, the file should open for you, and you probably will see the "summary page". There are 4 pages: 1) Summary Page, 2) Bread Calc, 3) Graphs, 4) Model. To change pages you click on the tabs at the bottom of the window. The only pages that you really need to understand are the Summary Page and the Bread Calc page.
Remember that the numbers you can change are highlighted in blue, other than the labels for ingredients and flours in the bread calc page, which can be changed, too. Look for the comments that pop up when you run your mouse over the text boxes with red triangles in them. Those comments should help a lot to figure out what is going on in the spreadsheets.
The Bread Calc page has a generic bread recipe on it. You can change the amounts you see in blue. Most of the amounts you enter are bakers' percentages. If you type 31% (literally a 3, a 1, and a shift-5 for % sign), it will take that as "31%". Some of the amounts are in grams. In that case, just type in the number, like to enter 12g type 12 (literally a 1, then a 2) in the field for the weight in grams that should be highlighted in blue. An example of that is the amount of storage starter.
On the Bread Calc page, you can set up a recipe by first setting the overall numbers down below: the total flour, the overall hydration percentage, the salt percentage, and the desired inoculation percentage (percent of fermented flour coming from the levain, typical example would be 15% fermented flour for the VT Sourdough). Then, enter the amounts of storage starter you want to use. I provided both a firm starter and a 90% hydration starter, but you can change the hydrations of either starter to match the starter you are using. The amounts of storage starter are specified in grams. You also specify the hydration desired for the levain, and specify the percentages of any additional levain flours as a percentage of the total flour in the levain. After that, you specify the additional ingredients and flours in the dough as percentages of the total flour in the recipe.
Just a side note, I do the bakers' percentages based on total flour weight, since that is the best way to scale the entire recipe and understand the overall important percentages like hydration and salt, I believe. Often, in recipe books they don't include the flour coming from the preferments in the total flour used as 100% for the bakers' percentages. So, yes, you do have to play a little with the percentages to get them to match up with a recipe in a book that may not use the same system as I'm using there. However, you can still put almost any hearth bread recipe into the format in the spreadsheet. I've done this same spreadsheet for quite a few different breads, including the Thom Leonard and the Essential's Columbia, as well as various miches, ciabattas, focaccias, and so on.
Finally, you specify your "additional flours" as percentages of total flour weight. The labels on the left for the "ingredients 1-4" and for the "flours 1-5" can be changed to note the flours and ingredients you are using for the recipe. You can see I did that for the miche recipe.
Once you've entered all the items in blue to suit the recipe you want, it will tell you the amounts in each case that you need. If you change one of the inputs, the various amounts will be recalculated. For example, if you change the percentage of one of the "flours 1-5", then that flour's weights will change, and also the "main flour" will be adjusted so that the total flour is still as specified.
The other page of interest is the "summary page", which has the rise time calculations on it. Once again, the numbers that you change are highlighted in blue.
There are three sections to the "summary page". The top is for the levain rise time calculations. The middle is for the dough rise time calculations. The bottom has a "stage calculator" that will allow you to enter the fermentation of the dough in a series of steps, and it will tell you how far the fermentation has progressed in total. You will see an "average factor" that tells starts very small and grows to about 1.0 when the dough should be doubled, and grows to about 2.3 when the final proof is finished. The stage calculator is very useful once you figure it out, but you don't need it at first.
The first number you need to think about is the number labeled "starter speed factor", which sets the overall speed of your starter. Once you know how fast your starter rises by double when fed with a particular flour type or blend, you can set "starter speed factor" to match your starter's rise time. Then, you can calculate other rise times with this summary page. That number can be set in the levain section and in the dough section, since the levain and the dough may have different flours. So, you need to run a test dough or two with typical flours and note the time for them to double, preferably measuring the volume fairly carefully. I would suggest doing a hydration of about 80%, so you don't get too much of a "crown" to confuse matters. It makes sense to do one that is large enough that you aren't getting too much "small dough" effect in the rise time.
For example, you might build a test dough with about 200g of flour. You could make a test dough with 32g of firm starter, 180g of flour and 148g of water. It will be fairly wet, but if you put it in a good rising container that has vertical sides, you can measure the time it takes to rise by double the volume. You note that time, and then set "starter speed factor" on that summary page in the levain section so that a levain with an inoculation of 10% (20g flour in firm starter divided by 200g total flour in the test dough), a salt of 0% (no salt), and a hydration of 80% has a doubling time of what you observed for the test dough. Of course, set the temperature to match what the temperature was for the rise of the test dough. Once you know the "starter speed factor" setting for your test dough, it should be a good number to use elsewhere in the calculations, including in the dough section. However, I've noticed that my doughs rise faster than my white flour levains because the flour blend in the dough is just faster rising. So, you will probably find that the test dough rises a little more slowly than your typical bread does, so you can use a little bit higher "starter speed factor" for the dough, which you will begin to figure out. For me, the "starter speed factor" number for my doughs is about 15% higher than my "starter speed factor" setting for a bread flour levain.
Once you have "starter speed factor" figured out, then the rest of the numbers are just the characteristics of your dough and levain. The inoculation percentages are listed for the recipe that you did in the "bread calcs", so you can just use those inoculation settings most of the time. The other numbers are overall hydration, overall salt, also same numbers as in the spreadsheet for the bread calcs. The temperatures are for the bulk fermentation and the final proof.
The stage calculator just lets you enter times and temperatures in a series of steps. You can see how far your dough progresses in fermenting that way. If you set "starter speed factor" so that the doubling time is right, then the average factor will be about 1.0 at the point the dough has doubled, and it will be about 2.3 when the final proof is complete.
Notice that if you put your mouse over the text boxes with red triangles in them, you will see comments I have made trying to describe the uses of the various fields.
No, I'm not talking about my gluteus maximus.
I'm talking about my glutinous maximus.
I'm baking on a baking stone at high heat. Have only been doing it that way for a few weeks. And I like the effect of stone + steam on my crust, and I'm getting great oven spring.
What's puzzling me is that the bottoms of my loaves are coming out soft! Top and sides have great, crunchy crust. Bottom is simply soft. It's cooked, but it's soft.
My hypothesis is that my doughs are going into the oven too wet. I'm having shaping and proofing problems that I think are down to this. So, I'm going to work with firmer dough next batch. But, in the meantime, do you reckon that would cause a soft bottom?
Has anyone else experiences a soft bottom when baking on a stone?
Thanks, in advance.

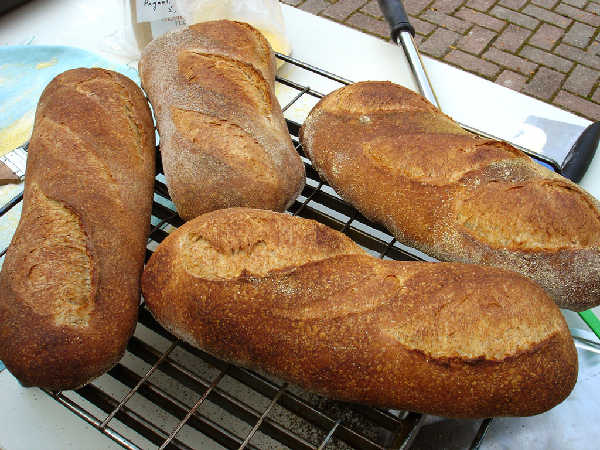
I've been prodded by a certain TFL friend (username starts with "Z") to do this recipe, and I finally got around to it. I have to say it's too bad this didn't happen sooner. The recipe is just excellent. I've included some photos of the process and a spreadsheet of the recipe I used.
The recipe I followed is almost exactly as specified in Artisan Baking by Maggie Glezer on pages 82-83 except I doubled the recipe and made 4 loaves. I used Wheat Montana AP in place of the bread flour and KA Organic AP in place of the AP flour in the recipe. I made the firm levain using 36g of my 90% hydration starter in 321g of Wheat Montana AP and 197g of water. The inoculation is slightly lower, and I'm starting with a somewhat higher hydration storage starter, since that's what I had on hand. I made the inoculation lower than what is specified to gain a few hours in my overnight levain fermentation, since I knew the dough would not be mixed for about a full 12 hours after the levain was mixed.
I kneaded the dough by hand using the suggested Glezer technique of working up and down the dough squeezing it and extruding it through my fingers. I also did some of her folding motions The slashing was easy, since this bread is only at about 65% hydration or so. I had to add a little more water because the Wheat Montana AP seems to absorb a little more water, but it is a firm, fairly dry dough. The flavor with the toasted wheat germ, whole wheat (I used Wheat Montana Bronze Chief), and whole rye was outstanding. The firm levain was just peaked when I used it, and the smells coming out of it were very pleasant when I added it to the dough.
I had a little trouble with the shaping stage. The dough was very gassy, even though I stopped the bulk fermentation after 3 hours, before it had doubled, as specified. As I shaped the first one, it just seemed like the dough needed to be deflated or I would have gigantic holes in it, so I did aggressively pat down the loaves, form them into rough ovals and let them relax a few minutes before forming batards.
I've been experimenting with my newly installed outdoor brick oven, which has been a bit tricky to figure out. I scorched the bottoms of these loaves a little, so a couple of extra moppings of the oven floor may help to cool down the hearth just enough. The temperature of the dome and air seemed good, as all but the bottoms seemed to come out nicely baked with the firing I gave it this time, which gets the hearth up to about 530F, the air temperature to about 450F, and the dome up around 600F. Those are just the temperatures right after firing. Then, I turn off the fire, let the oven cool with the metal door in place, and mop the hearth floor before starting to bake. I have been especially pleased with the ability to steam the oven with a garden spray mister and seal it with a wet, towel covered wooden door. The crusts are coming out great this way, and the freedom to do larger amounts all at once adds some fun to the whole process. Being outdoors while baking is pleasant too, but I'm not sure what will happen in the winter.
The other bonus of the brick oven has been that the retained heat can be used to cook an entire very delicious roasted dinner. For example, after baking I've done lobsters, corn-on-the-cob, and asparagus, and roast leg-of-lamb, candied yams, and roast cabbage, and roast chickens, roasted halved potatoes, and garlic heads. So, you can enjoy a whole afternoon of baking and cooking from firing the oven one time before baking.
I got the book last week, so today, my regular baking day, I wanted to make some. As luck would have it, after having started baking in April, I had finally decided to create a sourdough starter, but had to delay until recently due to my vacation. Last week I started creating Maggie Glezer's firm french style starter (as well as a whole wheat and rye version). The composition of that starter is identical to Leader's stiff levain (although the feeding formula is slightly different), so I used this in the recipe.
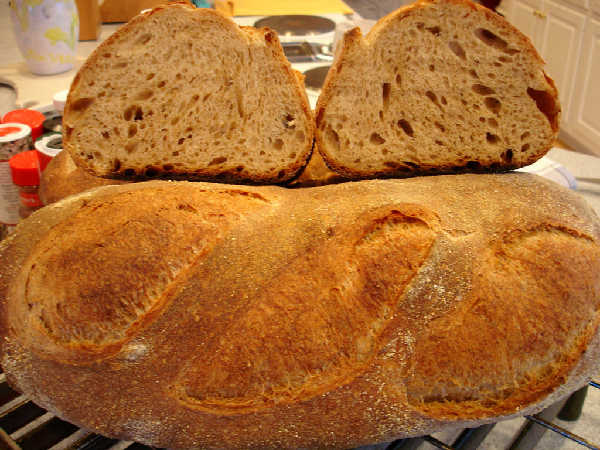
 Leader's Pain au levain
 Leader's Auvergne Rye Baguette with pancetta
I refreshed the starter shortly before midnight last night and it was good and ready this morning at 8:30. Both recipes use the same stiff levain, and use the exact same formula to create the levain starter (with some whole wheat added), so I made this as a single batch. I used KA AP flour (I discovered that my local Whole Foods sells Guisto's type 55 in bulk, but have not gotten it yet). I mixed the dough for the baguette about an hour later than that for the levain (scheduling reasons). I pretty much followed the rest of the instructions. Did one fold after 1 hour. Bulk fermentation took about 3.5-4 hours. I did insert a 10 minute bench rest before shaping. Proof took about one hour and 45 minutes. I did use a linnen couche so there was some additional work and care needed to transfer to the peel.
One thing I noticed is that in this book I finally found the correspondence between mixing settings describe as low/medium and the corresponding numeric setting on the KA mixer I have. That, combined with the 8-9 minutes mixing time seemed to make a far better dough than I've had before (I never mixed that fast, or that long). Could also be the starter though. I'll find out next time I make a non-sourdough.
The Pain au levain was scored in two different ways: one long slash, and several smaller and diagonal slashes. The dough took the slashes quite well. Steamed in cast iron pan with hot water and ice, and used a 3/4 in baking stone preheated for 1 hour. Oven spring was unbelievable! The crust did not quite turn out as nice and brown as I expected from pictures, but cutting and testing proofed this to be a non-issue. The crust was crackling during cooling and was superb when I finally ate the bread.
 Leader's Pain au levain: crumb
The baquettes were pretty much a similar story, except that I used pancetta instead of bacon, and I did not retard the shaped loaves overnight. They just had their almost 2 hour proof. I made them just too long for my oven, causing the tips to be squashed against back of the oven and door. Slashes worked out ok, but no ears. Crust and texture on the baguettes was fabulous. The pancetta is not as strong as bacon, and there was no overnight retardation to absorb flavors, so this was mild, but still very good!
 Leader's Auvergne Rye Baguette with pancetta: crumb
hi, just saying hello. i am new to baking and finally decided to join and get serious with bread and bagels. hope to learn and contribute what i learn to others. hopefully one day, my skill will take me out of my computer cubicle job!

This post is a bit off topic as it's really about nutritional quality of the ingredients rather than baking quality.
A recent post on trans fats got me thinking about good ole lard. I've never cooked or baked with it, but I understand it is available for purchase in many places now. My addled brain says that it is in fact less of a health problem than the hydrogenated vegetable shortening which replaced it.
I cook and bake with butter - OK, sometimes way too much butter. From a nutrition standpoint is lard really any different?