The Fresh Loaf

A Community of Amateur Bakers and Artisan Bread Enthusiasts.

Recent Blog Entries

SueVT's picture
SueVT

Caramel apple panettone made with sweet lievito madre.

I have been developing my sweet LM for a while now, initially to help with making sourdough shokupan, but now also to use with SD brioche and panettone. I am still adding a small amount of regular LM "just in case", but as you can see, the sweet LM rises very well. The flavor of the panettone is outstanding.

Sugar is adjusted in the LM care, and some of the sugar content in the dough was moved to the first impasto, to maintain the desired sugar level. The pH of the first impasto after 12 hours fermentation at 23C was 4.87. The final rise was complete in 3.5 hours. 

I am primarily maintaining the sweet LM at room temperature (not cycling warm and cool), with the exception of when I want to store it for a few days. Then it is simply refrigerated. This LM can be easily revivied with about 10 hours at room temp after a bagnetto and feeding. Longer term storage is TBD, as I am using the LM for several baking projects, and haven't been binding it. 

I am getting better results by maintaining a sweet LM separately, vs making a one-time build of sweet LM (as is done in several popular recipes). The maintained sweet LM continues to have an elastic texture long after a regular LM would be showing gluten damage. 

The primo impasto maintained a relatively high pH, and the dough still had good gluten development after 12 hours of fermentation. Even though this is an apple panettone with a lot of additional moisture in the recipe, the resulting crumb is delicate, light and soft. 

The same LM makes excellent sourdough shokupan and brioche. I will be using it for croissants also, and hope to be able to reduce or eliminate the need to maintain a separate liquid starter.


Pizzafreak's picture
Pizzafreak

Hi!

 Can I use 14% protein all purpose flour for my ciabatta?

I have 80% hydration and use an active sourdough starter. 
‘Tnks!

yozzause's picture
yozzause

Some more Lupin and Linseed with a dash of home milled pre fermented red wheat Lupin content was 20% made up with soaked splits and some Lupin Flour Linseed was 10%, Red Wheat was from refrigerated s/d excess. This dough was bigger than the last one and it wasn't till i weighed up the soaked lupin splits that i realised i was short on for the Lupin component so i decided id add Lupin Flour and also add more water for that too. I was very pleased worked like clockwork 2 hour bulk fermentation using Fresh compressed yeast @ 2% loaves weighed off at 515g each and baked in round pans


SueVT's picture
SueVT

For those of you who are interested in Italian baking, particularly the Italian brioches, these books from Italian Gourmet are worth noting:

Un Panettone Mondiale (with English text): "The stars and all the recipes of the first international national competition on the beloved Italian delicacy".

207 pages, with lovely photography and information on all the teams. Also recipes for each team's Classic, Chocolate, and "innovative savory" panettone entries. There are some interesting approaches, and some surprises in the regional savory panettoni: the Argentinian team's savory loaf has chorizo, purple maize, wine flour, chimichurri spices and Malbec, among other things! The Japanese team's savory entry has soy sauce, sesame oil, yuzu, kombu and cheddar cheese added to the mix. 

Many of the Chocolate Panettone recipes look fabulous. Here is the Japan team's version:

While the recipes are too large for most home bakers to handle, they will scale down easily. It's a fascinating and enjoyable read.

And yes, the Italians won. I'm not giving too much away here:

Next, Colombe e Dolci di Pasqua (in Italian). If you can read Italian recipes, which happens automatically if you do it enough, this is a wonderful book. All of the most well-known Italian bakers are here, with clear and well-illustrated versions of their Colomba.

Many of the chefs have multiple recipes, too. So little time, so many Colombas:


Finally, Ezio Marinato has put together an incredible 300-page collection of his creations, from hamburger buns and pizza to laminated pastries, biscotti, lievitati and of course numerous panettone recipes. Stunning photography throughout makes you want to bake every page.

Marinato is very influential in the Panettone world; 2023's coach of the winning Italian team in the Panettone World Championship, he is one of the true masters in the field. He is a teacher at various training venues and consultant to multinational companies. 

While coffee is notoriously difficult to work with in panettone recipes, it appears that Ezio Marinato has developed a recipe for it. 

Cheers, Sue


Benito's picture
Benito

I thought I’d try something a bit different both in the dough as well as the shaping for these buns.  We are going to have fish burgers tonight so wanted buns for them.  The braiding was somewhat successful but could be better since this was my first time trying this.  A slightly lower hydration would have helped this immensely, but ensuring a bit more flour on the dough when making the knots.  The excess hydration was due to the egg being 11 g too heavy.  Next time I’d beat the egg and then add the correct amount.  But overall I’m pretty happy with this first attempt.  They are almost like kaiser rolls with their five lobes.  The grey tone to the buns are related to the ground black sesame I’ve added to the dough. As you might know I love black sesame flavour so why not amp it up by have it ground into the dough in addition to on the buns.

To make 50 g of ground black sesame add 7.1 g sugar and 42.9 g of black sesames to a grinder and grind until a paste develops.  Can make extra but use about 6:1 ratio of toasted black sesame seeds to sugar since black sesame has a drying effect in the mouth that the small amount of sugar can balance out.


egg wash: 1 yolk, 1 tbsp milk and a pinch of salt, beaten…


Instructions

Levain

Mix the levain ingredients in a jar or pyrex container with space for at least 300% growth. 

Press down with your knuckles or silicone spatula to create a uniform surface and to push out air.

At a temperature of 76ºF, it typically takes up to 10-12 hours for this stiff  sweet levain to be at peak.  For my starter I typically see 3-3.5 times increase in size at peak.  The levain will smell sweet with only a mild tang.


Tangzhong 

In a sauce pan set on medium heat, stir the milk and flour until blended. Then cook for several minutes until well thickened, stirring regularly with a spoon or heat-resistant spatula. Let cool in the pan or, for faster results, in a new bowl.  Theoretically it should reach 65ºC (149ºF) but I don’t find I need to measure the temperature as the tangzhong gelatinizes at this temperature.  You can prepare this the night before and refrigerate it, ensure that it is covered to prevent it from drying out.


Dough

In the bowl of a stand mixer, add the milk (consider holding back 10 g of milk and adding later if this is the first time you’re making this), egg, tangzhong, salt, sugar and levain.  Mix and then break up the levain into many smaller pieces.  Next add the flour, I like to use my spatula to mix until there aren’t many dry areas.  Allow the flour to hydrate (fermentolyse) for 15 minutes.  Mix on low speed and then medium speed until moderate gluten development this may take 5-10 mins.  You may want to scrape the sides of the bowl during the first 5 minutes of mixing.  Next drizzle in the melted butter a little at a time, or alternatively add room temperature butter one pat at a time.  Slow the mixer down to avoid splashing the butter at you. The dough may come apart, be patient, continue to mix until it comes together before drizzling or adding in more butter.  Once all the butter has been added and incorporated increase the speed gradually to medium.  Add the mashed potatoes and ground sesame seeds gradually.  Mix at medium speed until the gluten is well developed, approximately 10 mins.  You will want to check gluten development by windowpane during this time and stop mixing when you get a good windowpane.  You should be able to pull a good windowpane.

On the counter, shape the dough into a tight ball, cover in the bowl and ferment for 2.5-3.5 hours at 82ºF.  There should be some rise visible at this stage.


You can next place the dough into the fridge to chill the dough for about 1.5 hours, this makes rolling the dough easier to shape.  Remember, if you do so the final proof will take longer.  Alternatively, you can do a cold retard in the fridge overnight, however, you may find that this increases the tang in your bread.


Line a large cookie tray with parchment paper.  Punch the dough down and then divide into 6 equal portions.  Form each into tight boules.  To shape, roll into a flat long oval with a rolling pin.  Roll into a tight tube of at least 12” length.  You may have to give the dough a rest if it contracts.  Tie into a knot, then knot again and pinch the ends together.  Place on a parchment lined cookie tray pinched side down.  Cover them and allow them to fully proof about 4-6 hours, they should pass the poke test.


After about 30 mins of proofing time, whisk your remaining egg and milk and then brush the small boules.


About 30 mins prior to end of final proof preheat the oven to 350°F. 

Immediately prior to baking brush the dough again with the egg and milk mixture.  Top with sesame seeds.


Bake the buns uncovered for 30-35 minutes or until the internal temperature is at least 190F. Cover if your rolls get brown early in the baking process.


Remove the buns from the oven and transfer to a rack to cool.

My index of bakes

Precaud's picture
Precaud

Spring is here... soon it will be too warm to use the large indoor oven. It's the season for min-ovens (MO) and bread machines (BM) to be used more frequently, often set up out on the porch.

Over the last year or so I've tested dozens of BM's, looking for the ones that do the best job at mixing/kneading, fermenting/proofing, and baking. This thread is about the baking part.

My tests revealed that most BM's are pretty ho-hum bakers, with maximum baking temps in the 255-300ºF range. This is OK for soft crusts and spongy crumbs, i.e. sandwich bread. But most bread recipes call for much higher temps than that.

Communicating with several manufacturers (most notably Zojirushi, Panasonic, and Saki), I learned that the temps that matter are not the air temps inside the oven chamber; it's the baking pan temperature. That's what they design for.

So how best to measure that? It's easy to imagine an elaborate, automated setup with contact probes and computerized logging to do it. But we don't have to go there. I am getting excellent results (i.e. results that match the manufacturer specs) using an infrared thermometer. More on that as we go.

So, what exactly are we seeing when we measure the baking pan temp? We're seeing how the BM's computer senses the temp and controls the heater elements to get the temps they want. The primary technique used for controlling the temperature is changing the on/off cycle times (aka "duty cycle") of the heater element. More time on than off = hotter.

To start things off, we'll look at one of the popular Zojirushi dual paddle breadmakers. Well-built and very versatile, they are probably the most highly-regarded "high-end" BM out there. I've tested all models prior to the "Virtuoso" (which has a 2nd heater in the lid), and they're pretty much identical baking-wise. Let's see how they do as bakers. The unit I'll test is the BB-CEC20, aka "Home Bakery Supreme", a classic that is still being made and sold today.

Zoji is one of the few companies who give pretty accurate time and temp data for their machines' cycles. For the bake cycle, the temp range is 254º (for Light crust) to 290º (for Dark crust). Since we're looking for its maximum baking temp, I'll use Dark mode, and 290ºF is the number to look for.

I've done this test with the stock pan several times in the past. But one of the cool things about the Zo is how easily it accommodates other pans, and Zo users frequently use them in their bakes. So I'll try that this time. The stock pan is aluminum so I chose a standard 9"x5" pan, also made of aluminum. Its weight is about half of the standard pan, so it should warm up more quickly. To simulate the size and mass of the dough in the pan, I used a mix of vermiculite and rice.

Here is the oven chamber of the CEC20. I made a trivet to raise the pan bottom to the same height as the standard pan. Note that the heater element enters on the right and wraps around the bottom perimeter. Also note the location of the temperature sensor on the back wall.

Here's a pic of the setup, showing where to place the infrared temp gun when measuring. Place it at the opposite end of where the heater elements enter the chamber. It needs to point at, and be perpendicular to, an exposed part of the pan. So don't do this with a full-size loaf; leave an inch or so at the top to measure. Oh, and DON'T do it with the lid wide open!! To minimize heat loss, only open it enough to get the gun in and take a measurement. Quick in and out... takes 4-5 seconds max.


Experience shows that 45 minutes is a long enough bake to see the computer's temperature control action. So this is a 45-minute dark mode bake. The list shows the pan temperature at the time remaining, in 5-minute intervals.

:45 Dark bake
:40    145º
:35    199º
:30    216º
:25    248º
:20    262º
:15    275º
:10    291º
:05    298º
:01    293º

The Zo is a very conservative baker and heats up slowly, even with the lighter-weight pan. It took 35 minutes for it to reach it's 290º maximum temp and settle in there. The heater element cycles on and off from the very start, and is never on for longer than about 30 seconds at a time. After about 15 minutes, it settles into "8 seconds on, 22 seconds off", or a 36% duty cycle. Even with a 700-watt element, this is very conservative heater action.

This measurement technique is easy to do and plenty accurate enough to assess the baking behavior of bread makers. In coming installments we'll see how some other machines bake, and maybe find ways to "trick" the computer into letting them bake hotter.


Benito's picture
Benito

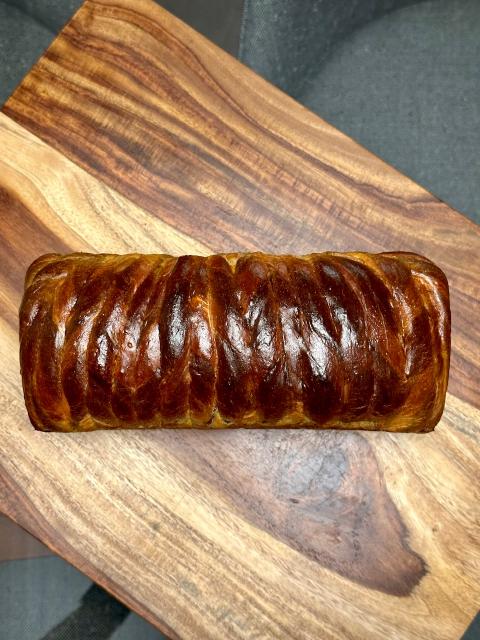
I haven’t done this style of bread in sometime, I found a package of freeze dried strawberries in the back of a cupboard so it inspired me to use it.  Matcha and strawberries are great together.  Although I have made this style of bread before, I’d never done with with my mochi formula which uses sweet rice flour as the tangzhong.  I have to say this worked out very well, the strawberry flavour comes through with the matcha without either overpowering the other.

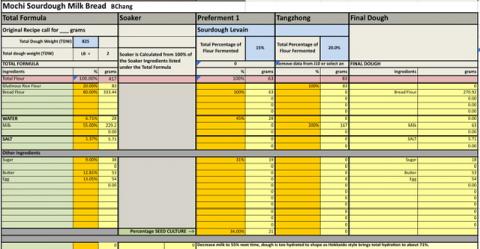
For a 4” x 9” pullman pan


8.5 g matcha 17 g sugar, just enough boiling water to make a thick paste

11 g of powdered freeze dried strawberries


Instructions

Levain

Mix the levain ingredients in a jar or pyrex container with space for at least 300% growth. 

Press down with your knuckles or silicone spatula to create a uniform surface and to push out air.

At a temperature of 76-78ºF, it typically takes up to 10-12 hours for this sweet stiff levain to be at peak.  For my starter I typically see 3-3.5 times increase in size at peak.  The levain will smell sweet with only a mild tang.


Tangzhong 

In a sauce pan set on medium heat, stir the milk and glutinous rice flour until blended. Then cook for several minutes until well thickened, stirring regularly with a spoon or heat-resistant spatula. Let cool in the pan or, for faster results, in a new bowl.  Theoretically it should reach 65ºC (149ºF) but I don’t find I need to measure the temperature as the tangzhong gelatinizes at this temperature.  You can prepare this the night before and refrigerate it, ensure that it is covered to prevent it from drying out.


If you plan on using a stand mixer to mix this dough, set up a Bain Marie and use your stand mixer’s bowl to prepare the tangzhong.


Dough

In the bowl of a stand mixer, add the milk (consider holding back 10 g of milk and adding later if this is the first time you’re making this), egg, tangzhong, salt, sugar and levain.  Mix and then break up the levain into many smaller pieces.  Next add the flour.  I like to use my spatula to mix until there aren’t many dry areas.  Allow the flour to hydrate (fermentolyse) for 20-30 minutes.  Mix on low speed and then medium speed until moderate gluten development this may take 5-10 mins.  You may want to scrape the sides of the bowl during the first 5 minutes of mixing.  Next add room temperature butter one pat at a time.  The dough may come apart, be patient, continue to mix until it comes together before adding in more butter.  Again, knead until well incorporated.  You will want to check gluten development by windowpane during this time and stop mixing when you get a good windowpane.  You should be able to pull a good windowpane.


Shape into a ball and divide into approximate thirds.  Shape the largest third into a boule and set aside covered with a towel.

Take one dough ball and gradually add the strawberry powder, slap and fold until the strawberry is fairly even throughout the dough.

Take the final dough ball and gradually add the matcha paste, slap and fold until the matcha is even throughout the dough.


You can either do shaping immediately or wait to allow some rise, 3-4 hours and then shape.  Either will work, waiting to allow some rise will create a more even crumb.


Lightly flour a work surface and the plain dough boule.  Roll out to at least 12” in length and about 8” wide, set aside.  Continue to do the same with the other two balls next rolling the strawberry dough out to 12” and placing that on top of the plain rolled out dough.  Finally rolling the matcha dough out again to 12” and finally placing that on top of the strawberry dough.  Optional roll out further if it has contracted in length.


Using a ruler and pizza cutter, cut the dough into evenly wide strips about 1.5-2 cm wide along the length of the dough but leaving about 2-4 cm of dough uncut at the end furthest away from you.  When all the strips are cut, twist the strips in alternating directions, clockwise and then counter clockwise.  Once all the strips are twisted, roll the whole thing into a log starting furthest away from you getting a nice tight roll at the start.  Once rolled transfer to your pullman pan on a parchment sling with the ends of the strips at the bottom.


Place in the proofing box set to 82-84ºF to proof until the dough comes to approximately 1 cm below the edge of the Pullman pan.  This takes about 8-8.5 hours at 82ºF, the yeast isn’t likely to be osmotolerant so it will take longer than you would normally expect.  You could consider spiking the dough with some IDY if you’re in a bit of a rush or want a less sour bread perhaps 0.5%.

Preheat the oven to 350F and brush the dough with the egg-milk wash about 30 mins prior to your dough reaching within 1 cm of the rim of the pan.  Just prior to baking brush with the egg-milk wash again.


Bake the loaves for 50 minutes or until the internal temperature is at least 190ºF, rotating as needed to get even browning. Shield your loaf if it gets brown early in the baking process. After 50 mins remove the bread from the pan and bake a further 10 mins by placing the loaf directly in the oven on the rack with the oven turned down to 325ºF


Remove from oven and place on a rack to cool completely before slicing.

My index of bakes.

Benito's picture
Benito

I last made these around the holidays and wanted to make them again based on comments I received.  Essentially there wasn’t quite enough ginger in them, the cinnamon was dominant the first time.  I fix that I’ve increase the ginger by 50% and based on comments from people who ate them, I think I’ve got that right now.

Makes 12 rolls in a 13” x 9” pan


Ingredients Dough

3¾ to 4¼ cups all-purpose flour 480 g (4 cups)

4 tsp. ground ginger 

1tsp. ground cinnamon

4 tsp. ground cloves

4.9 g osmotolerant yeast

¾ cup milk (184 g)

1 cup plain mashed potato

⅓ cup butter (76 g)

⅓ cup molasses (93.3 g)

1 tsp. salt

2 eggs


Ingredients Filling

¼ cup packed brown sugar

2 tsp ground ginger

3 tsp ground cinnamon 

¼ tsp ground cloves

1/16 cup flour (can be AP or bread) inc to ⅛ cup next time 

¼ cup butter melted 


Ingredients Frosting

85 g cream cheese

2 tbsp butter

2 ½ cups of icing sugar

1 tsp vanilla

1-2 tsp lemon juice


Instructions

1. In a large bowl stir together 480 g flour, 4 tsp. of the ginger, 1 tsp. of the cinnamon, ¼ tsp. of the cloves, and the yeast. In the bowl of your mixer stir milk, mashed potato, ⅓ cup melted butter, the molasses, eggs and salt. Add flour mixture to the liquid mixture. Mix then knead until gluten is well developed.

2. Turn dough out onto and shape dough into a ball. Place in a lightly greased bowl, turning to grease surface of dough. Cover; let rise until doubled in size (about 120 minutes).  Can do a cold retard at this point.  Even using osmotolerant yeast this will take longer than you expect, the cinnamon and molasses really slows fermentation.

3. Punch dough down. Turn out onto a lightly floured surface. Cover; let rest 10 minutes. Lightly grease or line with parchment paper a 13×9-inch baking pan. Prepare filling as directed in Step 4. Roll dough into an 18×12-inch rectangle. Spread with softened butter and sprinkle with filling, leaving 1 inch unfilled along one of the long sides. Roll up tightly, starting from filled long side and pinching seam to seal. Cut into 12 slices using dental floss; arrange in pan. Cover; let rise until nearly double in size (60 minutes). 

5. Preheat oven to 375°F. Bake 25 to 30 minutes or until golden. Cool in pan on a wire rack 10 minutes. Invert to remove from pan; invert rolls again onto a platter. 

6. While the rolls are cooling, in a medium bowl beat 3 oz. (85 g) softened cream cheese, 2 Tbsp. softened butter, and 1 tsp. vanilla with a mixer on medium until combined. Gradually beat in 2½ cups powdered sugar until smooth. Beat in enough lemon juice, 1 tsp. at a time, to reach spreading consistency. 

7. Once cooled completely spread with Cream Cheese Frosting. 

My index of bakes

Frodough Bakkings's picture
Frodough Bakkings

Here is a copy of a Baker's Percentage spreadsheet I developed.   I have included a blank version and a copy of my Country Loaf Recipe.

Baker's Percentage Spreadsheet

Sourdough Country Loaf

gabev50's picture
gabev50

thank you all for taking the time to read this lengthy post and any feedback is very much appreciated.

  • i have been baking a ton of bread the last 4-6 months and i have learned a lot, but am still struggling to execute really good fermentation. 
    • this last bake (naturally leavened) i pushed fermentation to the max (for me, at least): 40% inoculation, 10 hrs of total fermentation. the first 3 hours the dough temp was 85, then i let it coast for 6 more hours at room temp (RT 68). it was nearly tripled in volume so, thinking it was overproofed, i gently shaped it and only let it proof an hour before i baked it in a hot oven with steam.
    • the final crumb of this loaf was the same as all other previous loaves. open crumb near the very edge, but tight everywhere else. not great oven spring, a little heavy for its size, but great color. i feel like ill know overproofed when i see it. this still feels very characteristic of underproofed.


  • lastly, i’ve been working on some cinnamon raisin bread but still underproofing. bulk was great at 6hrs but the final proof was 3hrs (thinking it was ready!) at RT (68-69). bread came out lacking good oven spring, it felt heavy, and the crumb is very tight and weirdly dry on the inside. really showing how slow fermentation can be when the bread is enriched with egg, butter, sugar, and cinnamon.
  • sorry for no pictures, i dont know how to condense the photos from my phone so they can fit on the blog post.
  • my two questions after these two bakes are:
    • am i overlooking the affect of room temperature on fermentation time  (68 is pretty chilly)
    • is my starter just naturally sluggish and, is there a way to train it to work faster or, do i now need to develop the recipes/schedule based on how the starter performs 

Pages

Subscribe to Recent Blog Entries