The Fresh Loaf

A Community of Amateur Bakers and Artisan Bread Enthusiasts.

Recent Blog Entries

justkeepswimming's picture
justkeepswimming

It has been a while since I did anything creative with my bread making. If there is such a thing as a "comfortable rut", our usual 75-100% whole grain sourdough sandwich bread has been just that. With the pending visit of a family member, I was inspired to dust off the clay baker and do something more creative for her. My scoring skills are rusty could use some work (they were never all that great really), but otherwise it looks pretty good so far. It's cooling at the moment; I'll edit and add a crumb shot later as time allows.

Total flour 550 gm (KA bread flour 138 gm, Central Milling High Protein bread flour 137 gm, Sprouted Spelt 100 gm, Hard Red Spring (freshly milled) 175 gm)

 Levain 120 gm

 Water 375 gm  

Salt 10 gm 

Safflower oil 1 Tbsp (we prefer a little softer crust and crumb) 

Water and levain combined, then flour added. Mixed by hand until no obvious dry flour, then covered and rested ~ 20 min.  

Salt and oil incorporated by hand a bit, then kneaded in my compact Bosch for 10 minutes. Dough temp 80f at the start of bulk.  

Bulk x 4 hours (~ 50 % rise) with a couple of S&F in the first hour. Then pre-shaped > 15 min rest > shaped > into an oblong banneton, covered and into the fridge overnight.  

Baked today (after 20 hours of cold retard) in an oblong clay baker at 500f x 20 min (lid on) then 450f (lid off). It's cooling at the moment.  

I had been having difficulty getting a reasonable crumb since moving here. The 6000 ft altitude combined with my preference for a high percent of fresh milled flour haven't been a winning combination, and  I don't like the idea of adding VWG. Using just a bit of the Central Milling high protein bread flour seems to have fixed the problem so far, though the final proof is pending. I'll add a crumb shot later.  

I will probably not bake this very often over the summer months, but might repeat it once cooler fall weather returns. 


justkeepswimming's picture
justkeepswimming

This video popped up on my computer several weeks ago and it looked intriguing to play with. It definitely isn't going to win any awards for appearance or presentation.  

I tweaked the flour a bit (she uses 100% AP) and added a few seeds. I didn't take time to weigh some of the ingredients, this loaf was "flying by the seat of my pants" in some respects, lol.  

Flour 280 gm  (48 gm AP, 48 gm KA bread flour, 185 gm sprouted spelt)

Instant Yeast - 1 tsp 

Salt - 1 tsp

Sugar 1 – tsp

Hulled hemp seeds - 1 rounded Tbsp 

Sunflower seeds - ~ 2 Tbsp 

Lukewarm water 250 gm 

Olive oil (or any really) for the pan. (Video says 1 Tbsp but that was a bit much for my pan.) 

Side note... my frying pan is a Ninja Foodi Neverstick 10.25 in frying pan. Finding a lid that would fit was a bit of a challenge, but thankfully Amazon came through. The lid needs to be domed just a little, and the multi-pan lid we have dips down into the pan enough for the bread to stick to the lid when cooking. 

Process: 

 1) Mix the dry ingredients and inclusions. 

 2) Add water and mix until no dry flour remains. (After the initial hand mix, I let things rest for about 15 minutes then gave it a few S&F for good measure. Probably not needed, but I do take pleasure in handling the dough just a bit....)

 3) Cover and let the dough rise for about an hour.

 4) Grease the (room temp) frying pan with olive oil. 

 5) Degas dough by rolling the dough with a spatula.

 6) Sprinkle with flour and roll a few more times.

 7) Put the dough in the (room temp) frying pan.

 8) Cover and let the dough rise for 30 minutes.

 9) Cover and cook over low heat (20-25 min). A little bit of moisture condensed and dripped onto the top of the bread, but it didn't seem to do any harm. 

10) Turn over and cook for another 15 minutes without the lid. I checked at the 10 minute mark and there were areas that were still a little "doughy". Your time may vary... 

This was mostly cooled and ready to eat about 45 min after cooking. 

I've made it several times now. It was quick and easy, with very little handling. Bonus, it didn't heat up the kitchen. It might be fun for making with kids, camping (RV or other), or a variety of other uses. My 95 y.o. mother-in-law (who made her first loaf of bread ever about 2 years ago) thought she would like to make this. It definitely came in handy after being gone for a couple weeks. After only a couple of hours after getting home, we had fresh bread ready to eat... another plus while my starter was getting back up to speed. I suspect it will come in handy again at some point.  

"Bottom", just after flipping. Continued to cook 15 min on low, lid off.

Crumb shot, about 1 hour after cooling.


Bruce46's picture
Bruce46

First time attempting croissant dough. Any help with butter or margarine bread flour  yeast.   I have new sheeter 

any advice appreciated

Benito's picture
Benito

We are having a mediterranean fish stew tonight for dinner and leftovers tomorrow so I decided to bake these spelt sourdough baguettes, which I haven’t done for almost 2 years.  Since I baked them last I’ve made some changes to how I develop the dough.  I now use my Ankarsrum Assistent which I find is as gentle as hand developing dough and I do much more gluten development than I used to.  The idea is that if I develop the gluten more than I used to, the dough should be able to be fermented for a longer time allowing better flavour development.  Where I used to aim for 30-35% total dough rise as the time to bake, I am now aiming for around 60-65%.  I am hoping that the spelt at 9% will allow a nicely open crumb.  I was video recording my scoring, when I knocked my iphone onto one of the unescorted baguettes causing quite the deep dent.

Overnight levain

Built and fermented at 76°F to be ready in 10-12 hours.


Fermentolyse - mix 356 g water with all the levain, salt 10 g and diastatic malt 5.3 g to dissolve, then add AP flour to combine.  Slap and fold x 100 then add hold back water 27 g gradually working in until fully absorbed then slap and fold x 100.


Bulk Fermentation 82*F until aliquot jar shows 20% rise.

Do folds every 30 mins doing 2-3 folds

Could do cold retard at this point for  up to overnight. (Aliquot jar 20% rise)


Divide and pre-shape rest for 15 mins

Use spelt flour for couche

Shape en couche with final proof until aliquot jar shows 60% rise then cold retard shaped baguettes en couche for at least 15 minutes for easier scoring. 


Pre-heat oven 500*F after 30 mins add Silvia towel

Transfer to peel on parchment

Score each baguette and transfer to oven and bake on steel.


Bake with steam pouring 1 cup of boiling water to cast iron skillet dropping temperature to 480*F 

The baguettes are baked with steam for 9 mins.  Decrease the temperature to 450°F and continue to bake with steam for another 4 mins.  The steam equipment is removed venting the oven of steam.  The oven is left at 450ºF but convection is turned on and the baguettes bake for 8 mins rotating them halfway.  The oven temperature is then dropped to 375ºF and the baguettes rotated again if needed and baked for another 3-5 mins to achieve a rich colour crust.


My index of bakes

foodforthought's picture
foodforthought

…and when you make ice cream, you end up with a lot of unused egg whites. And when you have a lot of egg whites, @txfarmer’s super soft sourdough sandwich bread calls my name. So I whipped up 2.5 kg of her dough substituting buttermilk for her specified whole milk. And when it’s ice cream season, it’s also burger season so a quarter of the dough went into burger buns topped with @nbicomputer’s onion roll topping. Interestingly, the onion topping kind of turned the buns into coronavirus look-alikes. The rest of the dough went into what I’m now calling my White Buttermilk Brioche. The buttermilk causes a much darker crust than I usually get on this super light, shredible sourdough crumb. Buns worked great for our burgers and just had an excellent egg salad sandwich on the brioche. Good to be back home and baking.

Phil

fredsbread's picture
fredsbread

My wife wanted these sausage and pepper sandwiches for dinners this week, so I made a batch of "Italian bread" as sandwich rolls from Bread Baker's Apprentice. The only deviations I made from the recipe were to let the biga retard in the fridge for about 36 hours, and to retard the proof again for about 9 hours while I was at work. Both changes were due to not having time to plan the bake properly over the weekend after getting back from a work trip. Despite the changes, the rolls turned out great. I expected them to be longer, but the sausages only stuck out the ends of the rolls slightly, so it worked out fine.

Benito's picture
Benito

I hadn’t baked a cake in quite sometime and wanted something to share with the staff of our building.  I had this saved from quite sometime ago and never made it so it was overdue.

I unfortunately forgot to take a photo of the crumb.  It was nicely studded with the orange zest and was a lovely yellow colour.  I loved the orange glaze, it was thin and crisp and really enhanced the eating of this loaf.  It had wonderful orange flavour with hints of cardamom.  Cardamom is pretty citrusy so it really goes well with orange.

Ingredients for 1 loaf 

1.5 cups (187.5 g) AP flour

250 g granulated sugar (used 225 g and can be reduced even more try 200 g next time)

2.25 g kosher salt

3.75 g baking powder

1 tsp ground cardamom

180 g whole milk

112 g vegetable oil

75 g eggs (1.5)

1 tablespoons orange zest from one orange

3/4 tsp (3 g) vanilla extract


Instructions 

  1.   Preheat oven to 350°F (180°C). Butter and flour a (8/x 4/2-inch) loaf pan.
  2.   In a large bowl, whisk together flour, sugar, salt, baking powder, and cardamom; make a well in center of mixture. Add milk, oil, eggs, zest, and vanilla, whisking until smooth. Pour batter int prepared pan.
  3.   Bake until a wooden pick inserted in center comes out clean, about 55 minutes. Let cool in pans for 10 minutes. Remove from pans, and let cool completely on wire racks. Drizzle with Orange Glaze.


ORANGE GLAZE


For 1 loaf

120 g icing sugar

1 tsp orange zest

40 g fresh orange juice 


This turned out to be far too much glaze, half as much would be plenty.


1. In a medium bowl, whisk together all ingredients until smooth. Use immediately.

albacore's picture
albacore

Another Italian style bake using my DIY multi-cereal flour blend, as developed for my recent Pagnotta Multicereali bake.

It comprises 85% Dallagiovanna Manitoba flour with the balance being an equal parts mix of wheat, rye, barley, oats and rice grain all freshly milled together.

I've never had much luck with naturally leavened ciabatta - mine tend to be tough as old boots and with small alveoli, so I used fresh yeast in a 45% hydration biga. 100% of the flour is in the biga.

I made the biga in my Kenwood Chef with the K beater. I highly recommend this method as it is so easy. You just put the flour in the mixer, run at low speed and slowly trickle in the yeasted water and mix until all the flour is just hydrated.

It's important that all the flour is hydrated and I don't think some other methods of mixing do this.

The biga temp should be about 22c after mixing. It is then stored at 18-19C for 18-20 hours.

The rest of the bake was standard ciabatta method. Note that without a spiral mixer it is difficult to hydrate a 45% hydration biga and it might be better to make it at a somewhat higher hydration.

Here is my bake log:

https://drive.google.com/file/d/1FzIimDFs-A3mwSydhgP-w8xGJnLGHufG/view?usp=sharing

Biga ready to put in mixer:


I'm happy with this bake - good crispy crust and open crumb.


Lance


hellen's picture
hellen

Nigella seeds add so much savoury depth to bread and works really well with sourdough. For anyone in Toronto, Blackbird Baking has a seeded loaf which uses a mixture that includes nigella seeds. Their seeded loaf was a staple for me many years ago. The defining feature of the loaf, I think, is definitely the addition of nigella seeds! Recipe here.

I did not think to bake with nigella seeds until very recently. I have made these seeded buns 2 or 3 times prior but this is my first time adding nigella seeds. I was super pleased with the flavor it brought. If you've never tried nigella seeds, they taste savoury, vaguely allium, slightly oregano-ish. Hard to describe!

For this bake, I was a bit lazy with the stretch and folds. I usually do at least 3 and sometimes up to 5 stretch and folds for this type of dough, but this time I only did 2. As a result the buns were not as open crumbed as they could have been I think. 

I also typically bake the following morning after cold bulk fermentation in the fridge. For this bake however, I did not form and bake the buns until more than 41 hours later. The buns were flavorful but I think the crumb could have been better - in previous iterations of the same recipe, I have had a much airier open crumb structure. I think it was slightly over-fermented, but some additional strech and folds could probably have fixed this.

I have heard that pizza dough is optimally cold fermented for 3-5 days. I am wondering if this also holds true for doughs like ciabatta or if that amount is way too long. In both pizza dough and ciabatta the goal is similar - crispy crust, open crumb, big air bubbles. They are both also relatively high hydration doughs. Does anyone have experience cold-fermenting high hydration doughs for 3-5 days? I would be curious to know the results. 

If you would like to try these seeded buns, the recipe is here. I highly recommend trying nigella seeds!

Below is a previous bake using the same recipe, but without the addition of nigella seeds and only 14 hours in the fridge.


tpassin's picture
tpassin

I was looking through the Community Bake on ciabatta, and I didn't see that anyone had tried using the original recipe of the inventor, Arnaldo Cavallari.  It's available on line as a photo of the recipe (in Italian) in his bakery, and there is a faithful translation available, too (I know because I transcribed the recipe from the photo by hand, and translated it with Google Translate). I'll post the links later.  The recipe is very different from what us home bakers typically do, and also from most ciabatta recipes I have seen.

Here's a brief summary: 10kg flour, 50g brewer's yeast, 5L water. Mix in spiral mixer 5 minutes. Ferment 16 - 22 hours at room temperature. Add 2L water, 100g sugar, 250g salt. Mix 5 minutes slow, 8 - 10 minutes medium, desired dough temperature 25 - 27 C (77 - 81 deg F). Bulk ferment 30 - 40 minutes. Scale into 300g pieces and shape onto floured boards.  Proof 1 hour uncovered. Turn loaves over onto baking sheets, bake with steam "at a high temperature" for 30 - 35 minutes, releasing steam halfway through.

Wow! 100% pre-fermented flour.  50% hydration biga. 70% final hydration (modern recipes are usually 80 - 85%). Proof uncovered. So different.

The hydration seems very low but we don't know much about his flour mix.  He said he worked it out with a selection of five local flours of different kinds, and came up with a milling method suitable for the bread - he owned his own production mill.  So we don't know anything about the ability of his flour mix to absorb water, nor what the effective extraction was.  I was not able to find a picture of an original loaf nor its crumb so we don't really know about that either.

We do know that he was trying to produce an Italian competitor to the baguette for sandwiches, and that the bread is said to have had a thin hard crust and soft open interior.

Well, I'm not about to make a batch with 10kg flour, and if I wanted to I couldn't handle nor bake it.  So it will have to be scaled down, in this case to 300g flour for experimenting.  We know that larger batches of dough can behave differently, often needing less yeast and maintaining a higher temperature better.  The oxygenation during fermentation will be different.  Also, I'm not going to try to mix a 100% hydration biga with my old KitchenAide mixer.  In fact, I planned to do the final mixing and kneading by hand too.

So this effort won't be 100% faithful to the original but I'll try to come as close as reasonably possible.  Here are my going-in decisions:

1. Sourdough instead of yeast, so I don't have to guess how much yeast will act the same.  Maybe yeast in a later bake. I used 7% of starter.  I thought this should give me a fairly long initial fermentation, maybe 12 hours.

2. Flour mix: 80% KA Bread flour, 10% sifted stone-ground whole wheat, 10% durum flour.  Maybe this will be something like the original, but who knows?  At least it should taste good.

3. After working in the last 20% (hydration) of water by hand, do several stretch-and-fold sessions to replace the machine mixing of the original.

4. Let the dough ferment long enough to double or nearly so, instead of using the one hour specified in the original.  There are just too many unknowns to justify setting a strict time limit.

Everything went pretty smoothly.  The first fermentation seemed to be done after 11 hours, a little quicker than I had in mind.  Mixing in all that extra water by hand was tedious, and I let the dough rest several times to help it absorb all the water. Then I kneaded it in the bowl until all the layers had merged together.  I did two sets of 20 coil folds 15 minutes apart. After that I thought the dough was in good shape and wouldn't need any more.  Overall the dough fermented for about 2 hours after the last S&F before it had doubled.

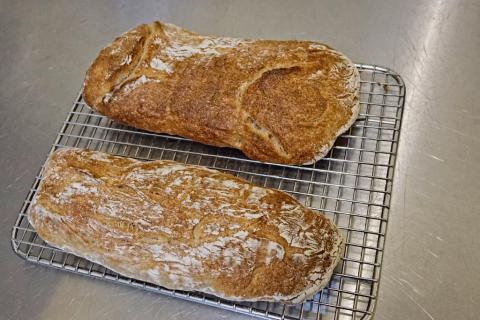
The dough was light and airy, and easier to handle compared with typical 80 - 85% doughs I've made in the past, but it felt rather wetter than I expected for a 70% hydration dough. The final proof took an hour.  The loaves baked with initial steam at 425 deg F for 27 minutes.

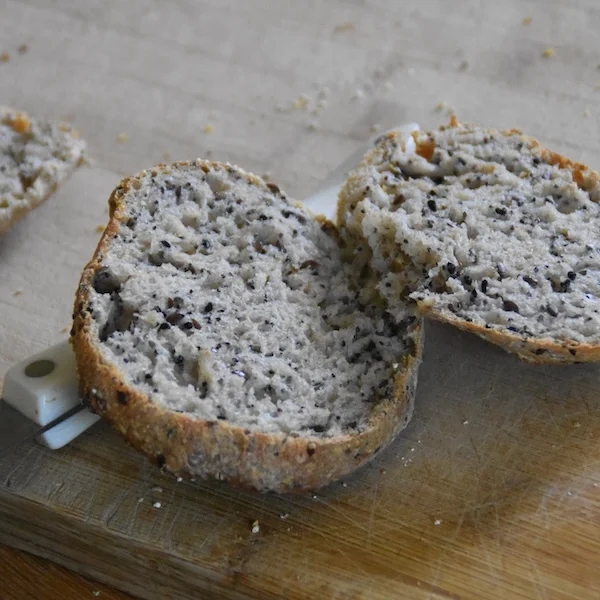
Overall I found the process fairly easy except for working in all the extra water.  Shaping and moving the loaves was easier than I expected.  The finished loaves look like respectable ciabatta bread.  The interior is soft but not as open as we have come to expect.  The crust was thin and on the hard side but not too hard to bite through in a sandwich.  The flavor is rich, with a little sourness as you would expect after the long ferment with sourdough.

As a sandwich loaf, I used it for a chicken salad sandwich for lunch today and I thought it was very nearly the perfect sandwich loaf. I was able to slice the loaf lengthwise and leave a bit of a hinge on one side.  The hinge had no tendency to break open.  This helps squishy fillings to stay in place. 

 What's next?  I want to try it again, using yeast for the biga.  I'll probably also repeat with sourdough, but less, maybe 4% instead of 7%.  I'd love to see what someone else comes up with, trying the original recipe.  This might be a very good place for a low-acid Levieto Madre starter, wouldn't you think?

Links :

The English translation: https://www.tasteatlas.com/ciabatta/recipe

The original recipe, in Italian - https://www.tripluca.com/paesi/europa/italia/la-ciabatta/

TomP


Pages

Subscribe to Recent Blog Entries