The Fresh Loaf

A Community of Amateur Bakers and Artisan Bread Enthusiasts.

pmccool's blog

pmccool's picture
pmccool

This weekend I got to try a couple of flours that I haven't used previously.  

The first was an unbleached AP type (brand name Eagle Mills) that I purchased at a Sam's Club.  With a protein content of 4 grams in a 30 gram sample, it's as high in protein as a lot of bread flours that I have used.  Whether I was brave or foolish is open to debate, but I decided to try in in the BBA pain a la ancienne even though I've never made that bread before.  The flour worked very well in this application.  I'm still of the opinion that the water content in Reinhart's formulas don't begin to produce the types of doughs that he describes in the text, because I had to add more water to get the kind of softness that he indicates.  Once I got the dough sufficiently hydrated, it was very supple and extensible without being excessively sticky.  In fact, I'll cut way down on the amount of bench flour next time (because there will be a next time with bread that tastes this good) so that I don't have as much on the finished bread.  The crust was crisp and the crumb was tender, though not as open as I had hoped.  My shaping left a lot to be desired.  And let's just state up front that it is better to remember to slash the loaves before they go into the oven, rather than a couple minutes after closing the door.  However, ugly or not, this bread has a wonderful flavor.  It was a great accompaniment to the jambalaya that my wife made for lunch Saturday.

The other flour I tried was Wheat Montana's Prairie Gold.  A local grocery has a display set up featuring both the Bronze Chief (a red variety) and the Prairie Gold variety grains.  Each bin of grain feeds into an individual grinder, which I think are impact types.  Just push a button and it drops freshly milled flour into a plastic bag.  It's a bit pricey at 79 cents per pound (which is quite a bit higher than the already-ground and bagged flour of the same brand sitting on the shelf).  Still, I got a couple of pounds of each, partly to play with freshly ground flour and partly to see how the gold variety tastes in comparison to the red varieties with which I'm already familiar.  I used a honey whole wheat recipe that I have used for many years so that I could gauge the behavior of the Prairie Gold against past experience.  The dough mixed easily, but seemed somewhat wetter (because the fresh flour wasn't as dry as the prepackaged stuff, maybe?).  The dough also handled well, becoming very smooth after 8 to 10 minutes of kneading.  It was much tackier than I usually see with this recipe, although it wasn't at all gloopy.  The bulk fermentation easily doubled but although the last rise in the pans was quite a bit slower and seemed to run out of gas before redoubling.  There was very little change in volume while baking.  The crust of the finished loaves is perhaps a little lighter in color than loaves made with red wheat but the crumb is markedly lighter.  It isn't as white as a white loaf, but it isn't dark either; more of a sand color.  Since the flour grind was relatively fine, the crumb is free of any grittiness and fairly close-textured.  The flavor is, well, like whole wheat, but less so.  There is no bitterness or "grassy" flavor that some find objectionable in whole wheat breads.  Some writers have described the flavor as insipid, but I don't think that is accurate.  I think it is more that people are gauging the gold or white varieties' flavor against the flavor profile of the red wheats, which have more tannins.  That's not unlike comparing a white wine to a red wine and complaining that the flavor isn't as robust.  I'm certainly willing to use it in my bread, particularly if I know that the people eating it aren't fond of the flavor of the red wheat.  For myself, I'm happy to continue using the red wheat flours since I like that flavor.

PMcCool

pmccool's picture
pmccool

Super Bowl parties are a great excuse for trying new recipes.  They also require lots of snack foods.  So, when I was asked to bring some chips, I happily agreed.  I was a good guest and took exactly what the hostess requested and then, well, then I improvised a little.


My wife is out of town for a week (hence no pictures with the post, since she has the camera with her), which left me with some additional time to putter around.  It occurred to me that I hadn't made pretzels for years and that they would be just the ticket for the party.  After rummaging around through cookbooks and recipe files, I came up with one recipe for whole-wheat crisp pretzels (in a Sunset publication, I think) and another for soft pretzels from the King Arthur 200th Anniversary cook book.  The soft pretzel recipe included directions for boiling the pretzels in a baking soda and water solution prior to baking.  Remembering the threads here about boiling versus not boiling and lye vs. baking soda, it seemed like a good opportunity to try the technique.


The whole-wheat version was almost entirely whole-wheat flour and water, with minimal amounts of yeast, honey, shortening and salt.  The recipe measurements were volumetric, but the scales still got a workout when I portioned out the dough for the pretzels.  They were very simple to make; just mix everything together, let ferment, scale, shape, brush with egg wash, sprinkle with salt and bake.  At the same time, they were very tedious--the recipe yields 8 dozen small (about 2-2.5 inch) pretzels.  If nothing else, all that practice certainly improved my shaping technique.  The first couple of dozen that I made had a certain Impressionistic quality.  You could tell that they were pretzels, but they were anything but uniform.  I perservered, though, and slowly got better and, just as slowly, got finished.  They baked to a pleasing shade of brown.  The directions called for piling them onto a couple of clean baking sheets and putting them back into the (turned off) oven to dry for at least 2-3 hours, using the oven's residual heat to drive off the moisture.  That didn't work quite so well as promised.  The next morning they were not nearly crisp but way past soft and not at all enjoyable.  So, I used the oven's drying cycle for the first time ever.  After a couple of hours of 180F temperature with the convection fan running and the door propped open slightly, they were bone dry and crisp as could be.


The soft pretzels from the KA recipe were pretty much the same as other soft pretzels that I have made, except for the boiling-in-soda-and-water step.  Boiling affects both the texture and the flavor.  The finished pretzel is moister than those that have not been boiled and, I think, somewhat chewier.  I'm a bit stumped about how to describe the flavor change.  There is something else besides the "typical" pretzel flavor.  Not bitterness, exactly.  Astringent, perhaps?  It's a subtle difference, but noticeable.  I should probably have baked one or two dry, for comparison purposes.  One of the people at the party asked if they had been boiled, but we were interrupted and I didn't get to ask her what it was about them that triggered her question.


Both varieties were a hit with the adults and the kids.  And if the kids are eating something that is almost entirely whole-wheat and liking it, it must be good.

pmccool's picture
pmccool

Since we had a big Italian dinner lined up with friends last weekend, I volunteered to bring bread.  One, it gave me a chance to try the Italian Bread formula from BBA; two, I decided to take another crack at ciabatta, also from BBA; and three, these people love homemade bread.

The Italian bread was pretty straightforward--and delicious.  Here's a photo:


The crumb was fairly close-textured and chewy, but not tough.  Great flavor, too, from the biga's overnight ferment in the refrigerator.  Gotta work on the slashing, though.  The loaf on the right came out pretty well, but the one on the left was definitely off the mark.

Bouyed by that success, I launched a poolish for the ciabatta.  That went well enough, but the final dough was more of a struggle.  Everything I read about ciabatta dough mentions how wet the dough is (the words "soupy" and "pour" seem to feature prominently).  This is the second time that I've used the BBA formula, carefully weighing all of the ingredients.  And, for the second time, I wound up with a very dry dough.  Even after working in another ounce of water, it was still able to stand up unsupported, although it could at least be stretched and folded.  I used bread flour, as listed in the formula.  The flour was from a newly opened bag that had been purchased less than a week previously.  I suppose it's possible that the flour was drier than usual because of the low humidity, but I can't fathom that there would be that radical a difference.  Anyway, I soldiered on with the bulk ferment, shaping the loaves and letting them rise.  When they were ready, I slid them onto the stone in the preheated oven, put water in the steam pan and this is how they looked when they came out:

The oven spring was fantastic.  At about 8 or 9 minutes into the bake, they had tripled in height.  These turned out far better than my first, sorry, attempt.  When we cut into them at dinner, I was surprised to find that the crumb was quite moist, almost cake-like.  Not at all what I had expected from the apparent dryness of the dough.  The texture was a combination of smaller and larger holes, not nearly the wide-open crumb that I was looking for (sorry, none survived long enough for pictures of the crumb).  It was thoroughly baked, since the instant-read thermometer indicated an internal temperature of 205F.  There are a couple of potential contributors to the moistness of the crumb. I probably turned the oven temp down a few minutes sooner than necessary and maybe I should have pulled the steam pan out at about the 10-minute mark.  Ah, well, better next time.  They tasted wonderful, especially with a drizzle of a fruity olive oil.

pmccool's picture
pmccool

Friends of ours are fond of panettone, so I thought that I would try making some for them as a Christmas gift.  After much browsing, I decided to use the recipe for Il Panettone Milanese, located here: http://italianfood.about.com/library/rec/blr0946.htm.  One of the things that drew me to this one is that it uses a naturally-yeasted biga, instead of commercial yeast.  I figured that my sourdough starter (which isn’t especially sour) would yield a good biga and it did.


I should say at the outset that I am pleased with the result, especially since the recipe yields two panettone that are in the medium to large range; one for the friends and one for the baker.  There are some things to address, but it is a very satisfying first attempt.  Here's a picture:


However, I’m not sure that I would use this specific recipe again, since it does have a few quirks.  For instance, the directions for the second-stage dough don’t say when to add the egg yolks (I put them in with the rest of the wet ingredients) and they call for water that isn’t in the ingredient list (I chose not to, since there was no indication of quantity and it looked like a repeat of the instructions for the first dough).  The recommended baking temperature is 380F, while Reinhart’s formula recommends a baking temperature of 320F.  Since I was improvising with soufflé dishes (one glass and one ceramic) in lieu of panettone molds or papers, I dropped the temperature to 360F and still wound up with rather dark crusts, even after covering them loosely with foil.  The recipe gives no indication of baking time, other than that a skewer should come out clean after inserting into the panettone.  I pulled them out of the oven when the internal temperature reached 185F, which took almost 1-1/2 hours.


I gave a slice to an Italian acquaintance from Milan and asked for a critique.  The first thing that she noted is that my panettone is denser than what she is accustomed to Italy.  While I followed the directions and allowed 6 hours for the second rise before baking, it didn’t achieve that almost lacy sponginess of a traditional panettone.  There are probably five factors at play.  First, additional time for the second rise would probably have helped.  My acquaintance says that a friend of hers bakes it frequently and allows it to rise to a point where it is almost ready to collapse.  While mine had more than doubled in size, it hadn’t yet reached the wobbly stage when it went into the oven.  Second, by baking it in soufflé dishes, the dough had room to expand sideways quite a bit before being forced to expand upward.  A regular panettone mold would have encouraged more vertical expansion, which may have improved the texture.  Third, this is a very rich dough, especially with fats (a pound of butter and 12 egg yolks!).  Fourth, there is almost 2 pounds of fruit in this recipe.  With that much fat and that much fruit weighing it down, the dough is going to need every bit of help it can get to fully expand.  The last factor, and I don’t have a way to address it, is that Italian bakers have a special rack for inverting and suspending the panettone as it cools.  That keeps it from settling and reducing in volume before it is cool and firm.  I didn’t notice much, if any, settlement which isn’t too surprising since the crumb wasn’t as spongy as it should have been.


Her second observation was that the candied fruit peel was somewhat bitter.  I had noticed that both the orange peel and the lemon peel that I purchased used the full thickness of the peel.  Since the white pith can contribute bitterness, that is probably the culprit.  I’ll opt for making my own candied peel from just the zest of the lemon and orange in future attempts.


The third observation that she made was that the finished bread was drier than the panettone to which she was accustomed.  I had expected it to be very moist because of all of the butter and eggs.  Maybe the recipe writer meant it when she said to add water to the second dough.  If only she had said how much!  A wetter dough might also have been able to expand more during the final rise.


The good news is that the flavor was very close to what my acquaintance knew and loved, so she was happy to have the slice that I brought for her.  I’m happy to know that my first attempt is close to the mark on this most important point.  Almost everything else can be tweaked and adjusted to get closer to a traditional panettone’s texture. 


Best of all, my friends were delighted to receive their panettone.

pmccool's picture
pmccool

After a 3 week stretch with no baking, I finally caught up a bit this past weekend.  With the exception of some crescent rolls for Thanksgiving dinner from a recipe in Southern Living magazine, everything was from the Bread Bakers Apprentice.

My wife volunteered me to bring cinnamon rolls to a brunch with friends.  I decided to try Reinhart's formula from BBA and it was a big hit.  I made a double batch so that I could try both the cinnamon roll and the sticky bun variations.  Plus, we needed a bunch anyway.  The dough is fabulously rich and sweet.  The inclusion of the lemon zest adds both a fragrance and a flavor that are still identifiable in the finished baked goods.  Because it was for a Saturday brunch, I made the dough Friday evening, shaped it into rolls and put them in the refrigerator to retard overnight.  That gave me time to bake them in the morning and convey them, still warm, to the brunch. 

I did take a few liberties with the rolls.  Reinhart calls for spreading a cinnamon sugar mixture on the dough before rolling it up, using white sugar.  I replaced the white sugar with brown sugar for some additional flavor.  And, remembering a delightful twist from my college days, I scattered some chopped apple and chopped walnuts on the cinnamon rolls before rolling up the dough.  (That idea comes from the enormous cinnamon rolls that are still available from the Hilltop Restaurant in L'Anse, Michigan, just up the hill from Lake Superior.  They will even ship the rolls to buyers in the U.S. if you want to order them from their website at http://www.sweetroll.com/.  And no, I don't get any commission, just a bit of nostalgia.)  The other variation was to add some chopped pecans on top of the glaze for the sticky buns.

Here are the cinnamon rolls, after coming out of the refrigerator:

You can see that the dough is so soft (I didn't even need a rolling pin to spread it into a rectangle; just patted it out) that some of the rolls have partially collapsed, even though they were refrigerated.  If I have to use the overnight retard again, I think that I will allow them to rise to nearly full size before putting them into the refrigerator.  That way they will hold their shape better.  As it was, I had to nudge them back into shape as they completed rising at room temperature.

Finished, they looked like this:

The sticky buns looked like this after being taken from the refrigerator:


As with the cinnamon rolls, I had to straighten these up as they rose.  You can see the layer of caramel topping in the bottom of the pan, with the bits of pecans.  Reinhart notes that any excess topping can be refrigerated.  Silly man!  We used it all!

After baking and inverting onto another pan to let all of that wonderful caramel coat them, the sticky buns looked like this:

Oh, yeah, they are good!  One friend said that although the cinnamon rolls were the best she had ever had, the sticky buns were over the top.  My wife has already told me that these will be on the menu when everyone is home for Christmas.

It also occurred to me that my sourdough starter had been neglected recently, so I started feeding it on Friday morning.  After four feedings, one of rye, it was ready to go to work Saturday afternoon.  Since there was enough to fuel two batches of bread, I started with the New York Deli Rye from BBA.  When I made the deli rye previously, I used fennel seeds in place of the optional caraway seeds.  This time, I remembered just how well dill gets along with onion, so I added dill seed to the dough.  It may not be original, but it is absolutely delicious in this bread.  What a great foundation for sandwiches!  The dill seed, I think, will be a standard part of this recipe going forward.  Because of the yeast that Reinhart includes in this formula, I was able to complete this bread before going to bed Saturday evening.  Here are the finished loaves:

I'm not entirely certain what caused the lighter blotchiness on the top crust, unless maybe it was the spray oil on the plastic that I used to cover the loaves while they fermented.

After setting the deli rye dough to bulk ferment, I started a batch of the basic sourdough bread, also from BBA.  After bulk fermenting and shaping at room temperature, the loaves went into the refrigerator.  On Sunday, after getting home from church, I pulled the dough out of the refrigerator and allowed it to finish fermenting at room temperature.  Then I baked it on a stone, with steam, starting at 500F and then dropping to 450F after 10 minutes.  When the internal temperature reached 205F (love that instant read thermometer!), took them out of the oven.  At that point, they looked like this:

I still need to practice slashing, although one loaf came out better than the other.  They also formed small ears along the slashes.  I have no idea what the crumb looked like, since I gave them to friends.  Apparently the flavor was alright, since they reported that one loaf was half-eaten by the time they got back to their house.

It was a real treat to get that much baking in over the course of a few days, especially since a couple of recipes were new to me.  And it was a pleasure to find some new favorites.

pmccool's picture
pmccool

With bread in the freezer, there wasn't much reason for baking this weekend, so I contented myself with some sourdough English Muffins.  After all, the starter was due for another feeding, right?  Now that they are cooling on the rack, I suppose that I really do need to get to work in the basement. 


Baking is so much more fun!


PMcCool

pmccool's picture
pmccool

Variety is good.  Even with all of the different types of bread to try and to enjoy, sometimes it's nice to do something a little different.  So, when my wife asked if I would make some Rocky Road Fudge Bars, I was happy to oblige.  This recipe was a Pillsbury Bake-off winner some mumble-mumble years back.  I've been making ever since I was in college.  It starts with a brownie base:

The base is then topped with a cream cheese filling:

The pan is then put into a preheated oven.  At the end of the baking period, 2 cups of miniature marshmallows are scattered over the top of the bars and the pan is put back in the oven for 2 more minutes to soften the marshmallows.  It comes out looking like this:

A warm, fudgy frosting is then poured over the marshmallows.  After swirling the frosting and marshmallows together, it looks like this:

This is when things get difficult.  Unless you want to eat it with a spoon, you have to let the bars cool until everything is solid enough to cut into bars.  Best to just put it somewhere out of sight until it is cool so that you aren't seeing it every time you look toward the kitchen counter.  Oh, and cut the bars small.  One is enough to induce a sugar rush and two could push you in the direction of a diabetic coma, even if you aren't insulin-dependent.

You can find the recipe at the Pillsbury site, here: http://www.pillsbury.com/recipes/ShowRecipe.aspx?rid=10098

pmccool's picture
pmccool

It's been a long week already, and it's only Thursday! I actually did bake last weekend, but am only now getting around to posting about it.

Beatrice Ojakangas' book, Whole Grain Breads by Machine or Hand, has been languishing on my bookshelf for nearly a year and I finally got around to trying one of her recipes. Ms. Ojakangas hews mainly to straight yeasted breads and does not appear to have an interest in or experience with artisanal breads. That isn't a slam, just an observation, since I didn't happen to see any references to baking on a stone or using steam during baking. If the recipe I tried is any indication, her breads are definitely worth making.

I selected a buttermilk rye with fennel seeds. During a recent trip to the store, I had picked up some buttermilk with no particular recipe in mind, so I had some on hand. My wife does not enjoy caraway, but she does like fennel and it goes well with rye. So, when I happened across that recipe, it was an easy pick. Here are a couple of pictures of the finished loaves:

And another of the crumb:

As can be seen in the photos, I should probably have given it a little longer to rise, although it was already doubled in size. That may have reduced some of the splitting. It might also have helped to use some steam during the first few minutes. The recipe calls for baking the bread on a baking sheet but I baked it on a preheated stone, which probably contributed to a larger than expected oven spring. Whether in spite of, or because of, my tweaking, the bread is delightful to eat. The crumb, while close-textured, is not dense. The bread is moist and chewy and makes a great base for sandwiches. The fennel contributes a pleasing crunch, in addition to it's fragrance.

I'm looking forward to trying more recipes from this book.

PMcCool

pmccool's picture
pmccool

We're leaving town today to visit our youngest daughter and son-in-law for their birthdays.  One of the requests was "Could Dad bring some bread?"  So Dad got busy and baked some sourdough bread from the King Arthur cookbook.  I tweaked the recipe by substituting 2 cups of rye for some of the AP flour.  I also made a batch of sourdough english muffins as well.  Picture below:

Luckily, the TSA is allowing foods in carry-on luggage, so we don't have to worry things getting smashed or stolen in the checked luggage.

PMcCool

pmccool's picture
pmccool

In case you are thinking that there is no way that particular sequence of dots can be connected, stay with me. You may want to send for the nice men in the white coats when I'm done explaining, but until then, think of it as a case study in aberrant psychology.

It began, innocently enough, with Floyd's suggestion (challenge?) to submit some ideas for harvest breads. Some of the things that I have long associated with Autumn are the late-season vegetables like winter squash, pumpkins, and parsnips. Squash can add moisture and texture to breads, as well as a low-key sweetness. Combine that with something savory, like sage, and you have the flavor foundation for a knock-out loaf of bread. Ah, you begin to see where this is going . . .

As I was rummaging around on the internet to see if there was a recipe that I could adapt or just plain steal, I came across a couple of interesting possibilities. Here is one of them: http://www.recipelink.com/mf/0/58698. And here is another: http://www.cookadvice.com/recipes/winter_squash_herb_bread-54827-recipe.htm.

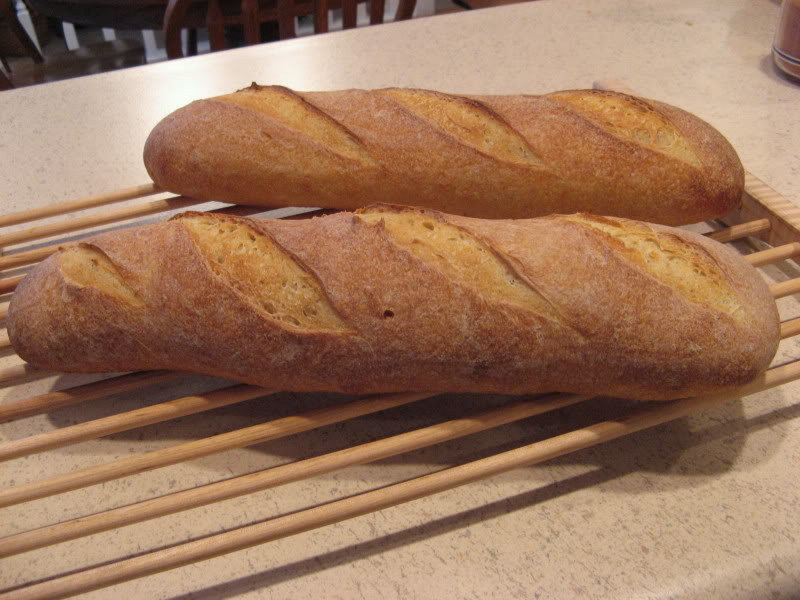
The thing that really grabbed my eye, though, was this recipe: http://www.stephencooks.com/2005/09/roasted_buttern.html. I hadn't been aware of the StephenCooks.com site previously, but I'll definitely be back to browse some more. Sorry, sidetracked again. Anyway, I had a new recipe to try, a fresh-from-the-farmers-market butternut squash on the counter, and a note with the recipe that suggested serving the carbonara with ciabatta. Hmm, ciabatta. That's been on my list of things to try for a while now. There was a stiff starter in the refrigerator that would serve well as the biga for the ciabatta recipe in BBA . . . (Are you paying attention to the dots?)

Saturday dawned, rife with possibilities. My wife was away all day, conducting a seminar. The grass was in need of mowing and there were bare patches to reseed, now that the weather has cooled. And bread to bake. Actually, there was enough starter, after doing 3 builds, to do two batches of bread. First things first: run to the lawn and garden center for 5 pounds of grass seed. Get home, prep the squash and put it in the oven to roast. Mix the ciabatta, set it to bulk ferment. It's definitely a sticky dough, but not nearly as wet as I expected from others' descriptions. First time to follow a recipe by weights instead of volumes.

Back outside to mow the yard. Pop back in to check on progress of ciabatta and do first stretch and fold. (Yes, I washed my hands first!) Took squash out of oven. Decided to make just a plain sourdough bread from BBA. After further looking, decided that one loaf would include walnuts and blue cheese, since my wife loves blue cheese. Mixed mixed and kneaded the dough for that and set it to ferment.

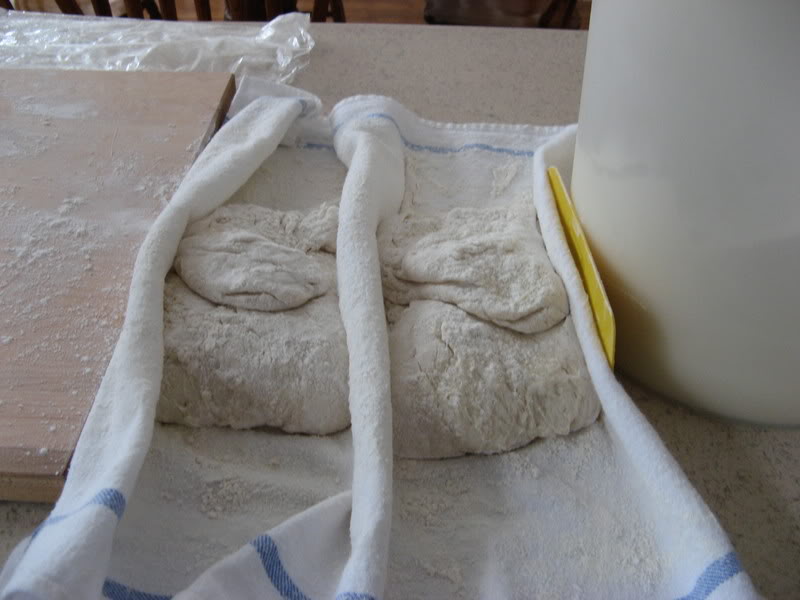
Back outdoors to rake and seed the front yard patches. Headed back in for second stretch and fold with ciabatta. Sourdough rising slowly but steadily. Decided to break for lunch. After lunch, devised couche from heavily floured dish towel and shaped ciabatta loaves per Reinhart's pictures in BBA. Wound up looking like this:

Before heading back out, I put the stone and a steam pan in the oven to preheat. Oh, and separated the squash flesh from the skin and innards now that it was cool enough to handle. Put it in the refrigerator for later.

Then I went back outdoors to rake and seed the patches in the back yard. Afterwards, back in to check on breads. Oven was ready, so gave the ciabatta a final stretch, per BBA instructions and popped them onto the stone, riding on some parchment paper. Filled the steam pan and winced to see some of the spatters landing on the oven window. Somehow escaped causing any damage. Shaped sourdough loaves and placed them in the now-vacant couche.

Went back outside to make sure the seed was properly covered and then started the sprinkler. Next, started putting up new hangers for tools in the garage (that's a follow-up from last weekend's project. Checked the ciabatta when it was close to time. Internal temp read at 202F, so whisked them out of the oven. Sourdough loaves were still rising, so shut off the oven.

My wife got home about this time, so after chatting about our respective days, I ran to the store for carbonara ingredients that weren't on hand at home. (Pancetta isn't part of my standard batterie de cuisine.)

On returning home, after reading the carbonara recipe again, decided that it might take a while to pull everything together, so started working on that. A couple of notes from that process: 1. The recipe calls for 2/3 of the herbs at one point, 2/3 of the herbs at second point, and the reserved herbs in yet a third step. I suspect that the amounts should have been 1/3, 1/3 and 1/3, respectively. 2. The recipe directs you to "sizzle" some of the sage leaves in butter and olive oil as a garnish. I managed to scorch them (literally too many things in the fire at that point), but wound up not missing them in the finished dish. They are a garnish, not an integral part of ingredients, so if you want to simplify by skipping this step, go for it. Fortunately, everything else came to gether successfully. 3. Although the recipe specifically calls for butternut squash, I don't see why other winter squash (buttercup, Hubbard, acorn, etc.) or pumpkin or even sweet potatoes couldn't be substituted.

In the middle of all of this, I noticed that the sourdough was about ready for the oven, so I started the preheat. Since it hadn't cooled completely yet, it got up to temperature fairly quickly. Eventually, the carbonara came together and the bread baked as it should.

The carbonara was fantastic and, yes, pinot grigio is a very good accompaniment. This recipe is definitely in the "keeper" category. It will probably also be a once or twice a year event, because of its complexity.

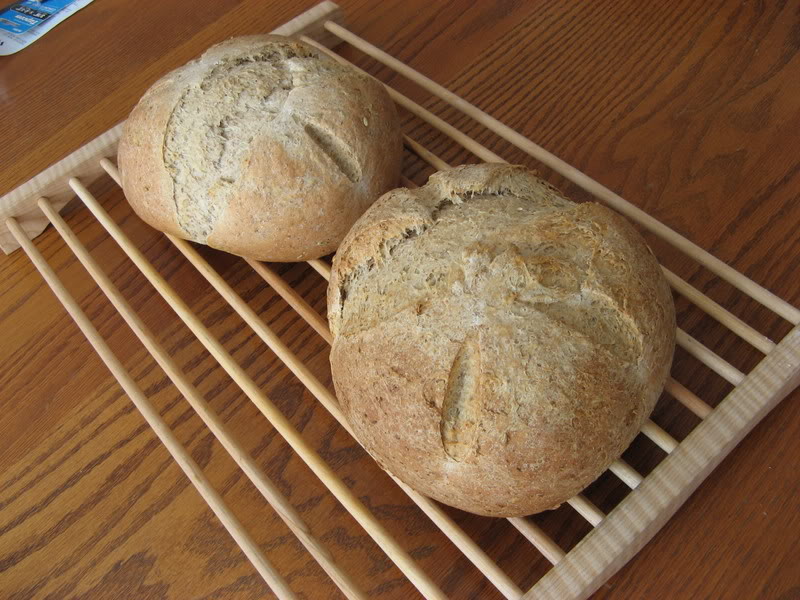
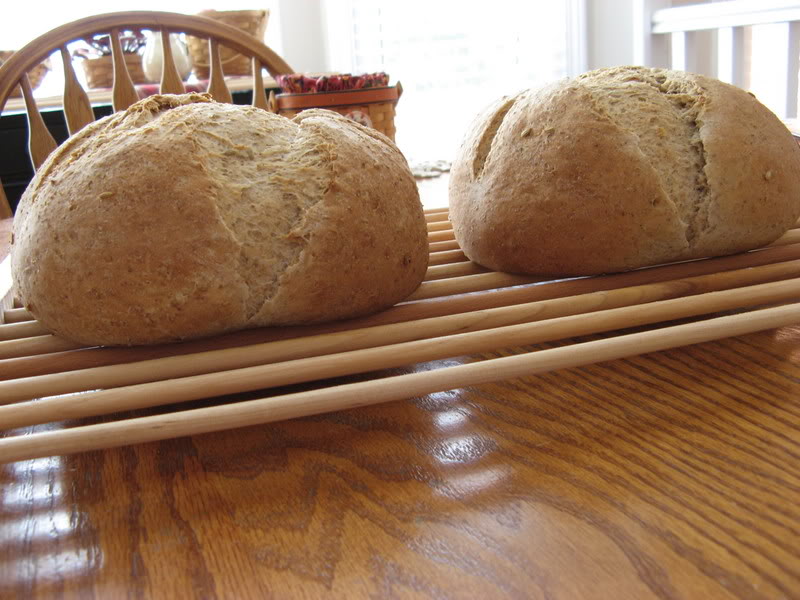
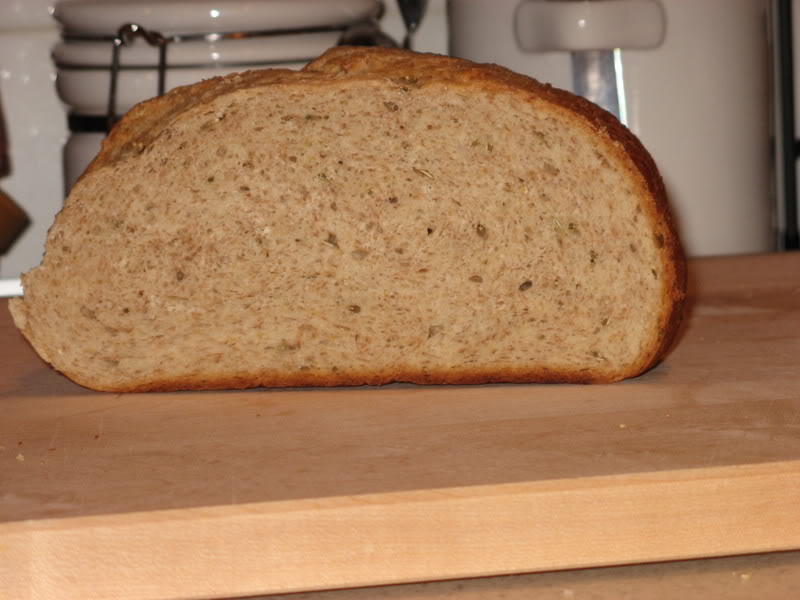
The ciabatta, however, is going to require some further practice. I don't know if it was the use of the stiff starter for the biga, a too-low hydration, my inexperience with and/or mishandling of this bread, or some combination of those elements, but it wasn't a thing of beauty. Like most sub-par bread experiences, it was, at least, delicious. The crumb was, well, bready. I was looking for an open and big-eyed crumb and wound up with a relatively close-textured, soft crumb. And the shape--well, I'll keep trying.
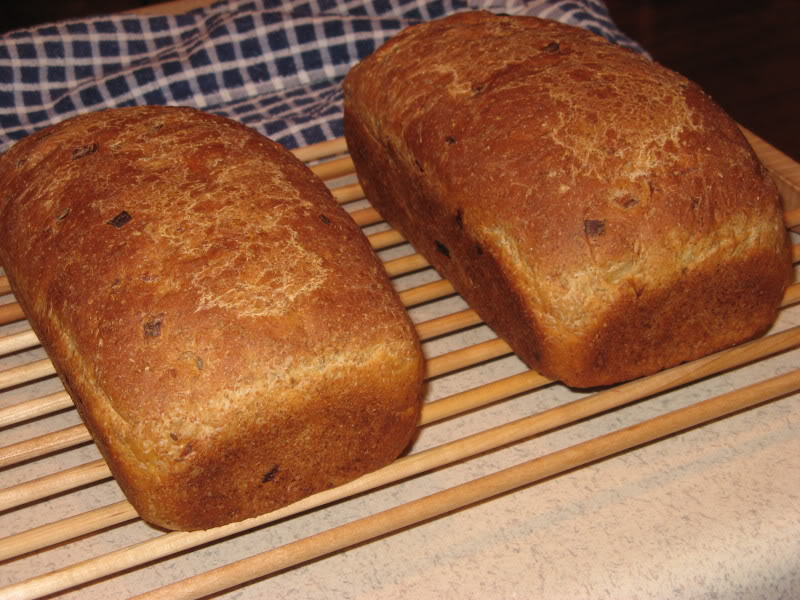
Here's a photo:


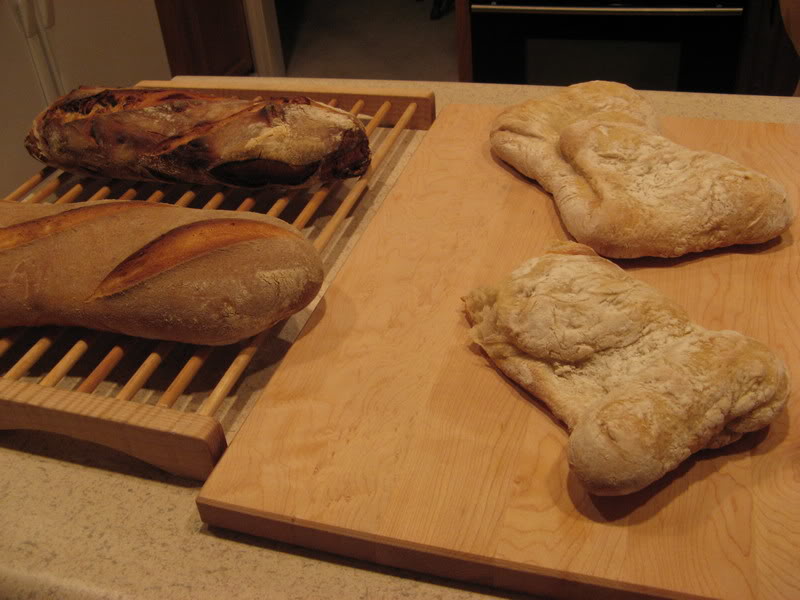
The two ciabatta are on the right. You might be able to make out part of the crumb of the nearer loaf. Sorry that the view isn't clearer. The front loaf on the left is the plain sourdough; the rear loaf on the left is walnut/blue cheese sourdough. I was braced for a strong cheese flavor in the walnut/blue cheese loaf, since I'm not especially fond of blue cheese, but was pleasantly surprised that the cheese flavor was subtly blended with the other flavors. I haven't cut into the plain loaf yet.

A long day, lots of work done, good bread and a fantastic dinner to wrap it up. Not bad at all. And, needless to say, Sunday was a quiet day. Thanks, Floyd, for triggering my pinball progression.

PMcCool

Pages

Subscribe to RSS - pmccool's blog