The Fresh Loaf

A Community of Amateur Bakers and Artisan Bread Enthusiasts.

JonJ's blog

JonJ's picture
JonJ

The last few loaves have been an experiment in varying the flour that is used together with a white bread flour base. All of these breads are 80% white bread flour; the experiment is in varying the remaining 20% to be either chakki atta (Indian stoneground wholewheat), unsifted wholewheat (without germ), wholegrain spelt, semolina or rye.


All breads had a hydration of 80% and were made according to the Full Proof basic open crumb recipe, however a machine mixer was used to incorporate the levain and salt. The remaining steps were true to the recipe, including lamination, coil folds and waiting for the dough to rise to a volume increase of between 55 and 85%, followed by overnight cold retard. The white bread flour used was "champagne valley" which has a protein content of 11.7% by itself, so vital wheat gluten was used to increase that protien content in order to support the 80% hydration (final protein was 14.9%). The levain used for all was 90% white bread flour and 10% rye.

Some flours were much harder to work - the spelt dough was extremely sticky. The semolina was particularly tiny, had a glossier texture than the others and made the best toast. The rye was super soft and spongy (and maybe the atta, wholewheat and spelt would fit into the spongy group too). A tighter shaping seemed to have been achieved with chakki atta and wholewheat, probably because they absorbed more water, and my personal favourite was the unsifted wholewheat, but it is hard to remember and it might have been more accurate to compare side by side rather than relying on my fallible memory of how they tasted.

All of these breads were lovely to eat, and weren't as different from each other as I'd originally figured. It has been a good learning experience knowing what each flour brings to the bread by itself, and also I realise that 20% can change the bread, but not as much as a higher percentage does and so they are all still white breads, albeit with a uniquely different twist in each case.

JonJ's picture
JonJ

Like many bakers here I've been strongly influenced by Full Proof baking. The basic open crumb recipe has worked very well for me in the past, and the detail described in Kristen's method has allowed me to get a feel for where to push the envelope with the breads that I make, although, of course this method is not for a lazy baker!

I'm also currently in the throes of developing my own approach with how to use a stand mixer in my sourdough baking. This is new to me, so thought a bread story midway along this journey would be worth writing about here.

The bake described here has some unusual features:
- the stand mixer is used to assist with the incorporating the levain  (and this involves some experimention with bassinage to mix at a lower hydration at first with an increase the hydration afterwards)
- forgot to add the seed topping just after the shaping and added it just prior to bake, so tried a seed topping together with a fancy scoring (which ultimately didn't work out)
- finally the shaping was done after a higher volume increase than normal.

The process followed is mostly faithful to Full Proof's method, with the major change being that the stand mixer was used to incorporate the levain into the autolysed dough. And almost immediately after that the mixer was again used to incorporate the salt (without the 30 minute wait normally done with the method). 3-4 minutes of mixing was done on the slowest speed (using a vintage Kenwood) with 2 hour autolysed dough to incorporate the levain, followed by another 4 minutes to incorporate the salt. The salt was mixed into some of the held back water, not one of my best ideas as I realised I had to throw it into the mixture due to undissolved salt and it took a few turns of slopping around in the bowl before it was incorporated, I could see then why folks prefer to pour the salt grains directly into the mixer. Finally, an additional 4 minutes of mixing was done to slowly incorporate the held back water to bring the final hydration up to 80% from starting at around 70%. The dough was taken from the mixer bowl and directly given a counter fold.

Thereafter the rest of the process followed was fairly faithful to the Full Proof method - with a lamination 45 minutes later, then 3 coil folds around 45 minutes apart, a period of rest until the volume increase was achieved and direct to final shaping without pre-shape. Then directly into a cold fridge for overnight retard. In other stand mixer experiments I didn't do any of the lamination or folding as the machine mixer is capable of developing the gluten well. But it was done here, mostly to see the result of what happens when you do that in conjunction with machine mixing. Call me crazy, but the lamination was so much fun to do with all that gluten!

Got stuck in an unexpected online meeting at the time I was due to do the shaping and ended up doing the final shaping about 45 minutes later than I intended to. So, the volume increase was around 85% as measured by aliquot jar rather than the 50% that I was aiming for, and it was immediately placed into a cold fridge for overnight retard and baking the following day. Quite liked the extra benefit that gave to the crumb, and still had a fairly good oven lift which surprised me.

I might keep the volume target higher like that! Or try what Benny has been doing and shape at 50% and let it sit at room temperature until the aliquot jar says something like 85% before placing the bannetons into the fridge. Not sure what difference that would make and if it would be better.

The flours used for this bake are as per the Full Proof method, 79% bread flour (I did sub some of that with vital wheat gluten as my flour is only 11.7g/100g protein; with the VWG the final protein became 14.9g/100g), 20% wholegrain (Indian Chakki Atta was used), and 1% rye which came from the levain (levain was built with 90% white bread flour and 10% rye with hydration of 100%). When I repeat this bake I intend to use 'real' wholewheat instead of the Chakki Atta - I like seeing larger bran particles in my breads and it just makes it seem more wholesome, but I can't really articulate why this would be preferable!

Lovely fizzy levain prior to it being mixed into the autolyse dough. This levain was only 2 hours 10 minutes old (or two hours since the overnight levain was fed further;  the growth from the height of the rubber band took 2 hours 10 minutes). It helps to be in summer conditions - room temp approx 26 deg C.

Levain was fed 1:10:10 overnight, and then the next morning it was given a 1:1:1 feed when it was at the height of the rubber band. The levain is 90% bread flour and 10% rye at a hydration of 100%. Most recipes suggest feeding 1:2:2 before baking, does it make much difference, I wonder? I'm just impatient and prefer a 1:1:1 feeding prior to using in a bake, although 2 hours makes it feel a little bit like I'm using instant yeast!

Aliquot jar at time of shaping. Trying to be more accurate with how I read the jar - there is a mark on both sides of the jar and a photo is taken with flash. Can digitally estimate the volume increase by counting the number of pixels on the photograph, and then I average the measurements from both sides of the jar. Was a little inspired to up my aliquot game by Benny's YouTube video.

Prior to shaping. Still holding shape from last coil fold which was 2 hours previously.

The next morning before baking. Had forgotten to add the seed topping after shaping, so just prior to shaping thought I'd do an elaborate score as I could see what I was doing.

Seeds added after scoring using an egg white wash. Do prefer having seeds on my breads!

The baked loaf had a great lift. (Comme une vraie boule). The attempt at elaborate scoring was largely lost, but can't help but wonder if the scoring allowed the bloom to hold such a nice shape.

Pleased with the crumb, will certainly use the stand mixer again in my baking going forward.

JonJ's picture
JonJ

The community bake provided the excuse to bake a simple ciabatta recipe that a friend has been baking for years.

It is the exact opposite of my recent sourdough breads in almost every dimension: instant yeast, has no autolyse, uses sugar, is super rapid, no wholewheat, etc etc. Even for an instant recipe it is fairly minimalist eschewing the biga or couche or anything that would complicate the life of the home baker for whom the original recipe was intended.

Sometimes it is fun to try something radically different, and it reminded me of what was possible in bread baking.

The recipe then:

  • 500g white bread flour (stoneground, 11.5% protein)
  • 450g water (lukewarm - 28 deg C)
  • 2.5g sugar (0.5 tsp)
  • 4.5g instant yeast (1.5 tsp)
  • 13g salt (1.5 tsp)
  •   13g olive oil (1 Tbsp)

    - Mixed as an all-in-one-mix; first mixed the dry ingredients (yeast, flour, sugar, salt) to ensure even distribution and then added the lukewarm water. Note: the original recipe calls for adding the salt after the dough was mixed, but went even minimalist than that with an all-in-one.
    - Five minutes of stretch-and-fold (in-bowl) after mixing. More like an in bowl stretch and slap. After five minutes dough was still sticky, but there was some evidence of gluten formation and it was holding shape better. Original recipe says you can do machine mixing but should finish off by hand, and being minimalist again did everything by hand.
    - Smothered  top of dough in bowl with olive oil and let the oil run down the sides of the dough in the bowl. Coverred bowl and left until doubled in volume. This took around 1h 45min for me (RT of 23-24 deg C).
    - Tipped out onto heavily floured surface and did a basic 'envelope' shaping. No couche. This is where I went a little wrong, should have gone directly onto the final tray rather than having to move it again and there was certainly some degassing and flatness caused by that.
    - Baked at 200 deg C for 30-40 minutes until golden brown showed on top and base tap sounded good (took 35 min).

    Since I was breaking all the rules we only waited 30 minutes for cooling before we tucked in with good butter which melted instantly. Soft crust, nice mouth feel, lovely salty taste. Certainly, a poor crumb compared to the true sourdough master pieces from the community bake, but for a low effort effort this was a surprisingly solid recipe.

JonJ's picture
JonJ

Eva, of Bake Street has got an effusively charming recipe for a sourdough coconut bread that includes both coconut water and fresh (or rehydrated) coconut in the dough. It makes an excellent, and interesting bread. Having just made it, I can see why she says it is a bread to return to again and again.

The original recipe was modified for my circumstances. Circumstances being that I didn't have any fine semolina (rimacinata) flour to hand but did have a bag of Italian pasta flour! Yes, both can be used for making pasta, but the one is soft wheat and the other semolina and the gluten contained in them is quite different - but nevertheless figured it could only help to make a softer bread and it turned out quite nice too. So, this is my version of Eva's recipe:

  • 400g stoneground white bread flour (the one I used had 11.7% protein)
  • 100g pasta flour (Molino Dallagiovanna 000 in this case)
  • 10g  vital wheat gluten (only added to compensate for the original 110g of fine semolina that was substituted for by pasta flour)
  • 90g  young levain (100% hydration; 80% white bread flour & 20% rye)
  • 185g coconut water (100% coconut water, in a bottle, from Thailand, no extra sugars added, but fairly sweet by nature)
  • 115g water
  • 10g  salt
  • 30g  rehydrated coconut (from desiccated)


I prepared the bread using a fridge ferment (because that is what I like to do, and also we're entering summer now in the southern hemisphere, so it helps with the timing!) I'm fairly certain the bread would work just as well and be fairly similar if it was prepared using Eva's more conventional method, but if you've never done a fridge ferment you might find the method that was used interesting:

- In the morning of day 1, the dough was prepared for a long approximately 12h fermentolyse (for further processing that night). The fridge water and coconut water used were added cold, directly from the fridge, and the fermentolyse took place in the fridge. Theoretically there should be less fermentation because we'll be in the fridge and start with cold liquids, but it seems like there is still some, perhaps because the other ingredients were at room temperature. All of the dry ingredients were mixed together, and in a seperate bowl the levain was whisked into the water and coconut water mixture. This was then combined into the dry ingredients and mixed by hand for a few minutes until the shaggy stage, thereafter it was placed in a tub in the fridge until the evening. The rehydrated coconut was not added at this step, as it will be incorporated into the dough in the evening by means of a lamination.

- In the evening of day 1, the tub was removed from the fridge and in my case I did about 5 or 6 minutes of stretch and folds and general hand mixing to make sure the dough was no longer shaggy. The long fermentolyse meant the dough was smooth and easy to work with, but it was fairly stiff from being cold. After the initial stretch and fold, the dough was left for about 30 minutes, and then spread out on the work surface for lamination. The 30g of rehydrated coconut was added between the layers of the lamination. It was then left for around another 30 minutes, and a coil fold was performed on the dough, straight after which it was returned to a tub and into the fridge. The total time out of the fridge for this step was therefore around 1 hour.

- During the course of day 2, the tub was removed 3 times from the fridge for additional stretch and folds. The method of "txfarmer" was followed - with lightly oiled hands the dough was removed from the tub, in both hands it was gently stretched in one direction and folded back on itself, and this action was repeated at right angles to the first stretch. The dough was then placed back into the tub and back into the fridge, until the dough had relaxed sufficiently to repeat the process, about every 2 hours.

- By the evening of day 2, the dough had increased in volume by around 40 to 50%. Looking through the bottom of the plastic tub some bubbles in the dough were evident. The tub was removed from the fridge, the dough was immediately pre-shaped and left covered for 30-40 minutes. It had slumped a little at the end of that interval and then a final shaping was performed. The top of the dough was rolled in some rehydrated coconut to provide a topping to the bread. (I naively attempted to use different coloured rehydrated coconut for this, some plain and some that had been soaked in coffee, but this exercise was ultimately futile - all of the coconut used for the topping eventually came out with the same dark colour after baking!) After shaping the dough was placed in a banneton (in this case a tea towel coated with brown rice flour with a bowl for support, so not a traditional cane banneton). The entire banneton was wrapped in a large plastic bag, was sealed and returned to the fridge.

- On the morning of day 3 the bread was baked. Bake temperature was at 230°C for 20 minutes covered and 20 minutes uncovered. The uncovered period was extended for a few minutes to get a darker colour (I went 3 minutes longer). The oven was switched off and the bread was left in the oven with the door cracked open for an additional 20 minutes to get a crispier crust, and then the bread was removed and cooled on a cooling rack for at least 1 hour before the first slice was made.

What is surprising with this method is how little time the dough spent out of the fridge. During the entire preparation, the total time the dough spent out at room temperature was around 2 hours and 15 minutes, taking into account the various stretch and folds. Although the dough was kept in a middle fridge shelf at around 5°C, it is known that the fridge temperature fluctuates as the door is opened and closed, and it is assumed that all of the handling with warm hands also had an effect on the fermentation process.

It is quite amazing that fermentation happens like this, but I can assure you that it does! A great joy of the fridge fermentation process is that it isn't necessary to time the end of fermentation very precisely, the bread could have been baked a day later if circumstances required that and the process would be forgiving. I also find that a fridge ferment produces a fairly nice and even crumb.

An unusual feature of this particular preparation is the long fermentolyse, all in the fridge, interestingly in my observation it advances the normal fridge fermentation schedule fairly considerably. The 12 hour length of it allows for great gluten development (even with the levain incorporated) before the dough is handled. My personaly jury is still out on this one, I know that some people, like Trevor J Wilson like more control over their fermentation process and prefer a pure autolyse without the levain. A pure autolyse would present the difficulty of mixing levain into cold dough, not a problem for a machine mixer, but I'm not fond of cold knuckles. What I do like about it is that it makes for a faster fridge ferment, and what's not to like about a faster fridge ferment? I'm going to carry on experimenting with this one, still haven't decided either way if it is something I will always do, and also perhaps the distinction between autolyse and fermentolyse isn't all that large when your dough remains at fridge temperature, and the amount of levain is neither very large nor very small.


Sliced coconut loaf

Crumb close up, natural light colour was a little more white than this

(In natural light this bread is more white in colour than the photograph suggests).

The bread produced was lovely. Unexpectedly, it didn't have much of a coconut flavour, and it also didn't have any detectable sour flavour probably due to the cold fridge ferment. My staccato baking notes say, "Lovely loaf. No sour taste. Fantastic oven spring. Conconut chew and crunch on top. A bit like a stereotypical white bread, but with crispy crust and sourdough." I'm already missing this bread now that its all been eaten, and will bake another one as soon as I can get another bottle of coconut water.

JonJ's picture
JonJ

The sourdough fridge ferment method doesn't seem to get enough love on the internet, so I thought it might be of interest to everyone to describe a fridge ferment bread that I've just made. Additonally, there are  two things that make today's bread further unique - the use of 'almond milk', and the main flour is a white bread flour that also contains some bran and wheat germ.

My friend Laura is the one who taught me about the fridge ferment method, and this recipe is based on one of hers. She deserves all the kudos. What I like about the technique is that it is fairly low effort, and the low temperature ferment means it is easier to not overferment, giving you greater leeway for timing when to bake.

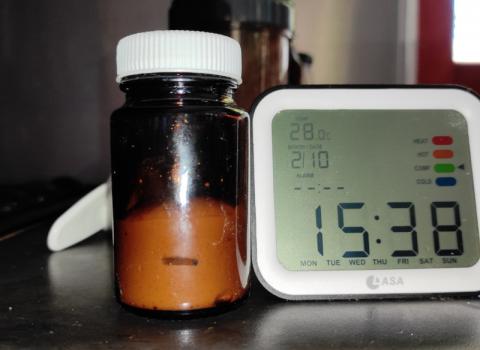
In total, this bread spent around 2.5 hours out of the fridge during making, with the majority of the bulking and final proof taking place in the fridge at a temperature of around 5°C.

Recipe:

  • 290g almond milk (unfortunately sweetened, try and find less sweet, or use milk)
  • 350g coarse white flour
  • 100g wholewheat flour
  • 100g levain (young, at 100% hydration from a mix of 50% Indian atta flour and 50% white bread flour)
  • 10g salt

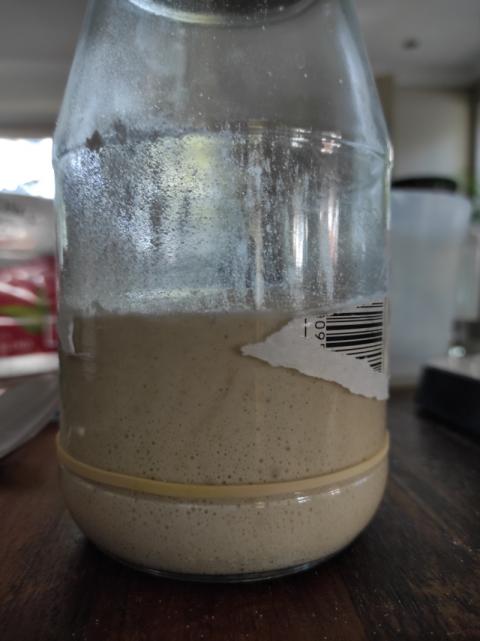
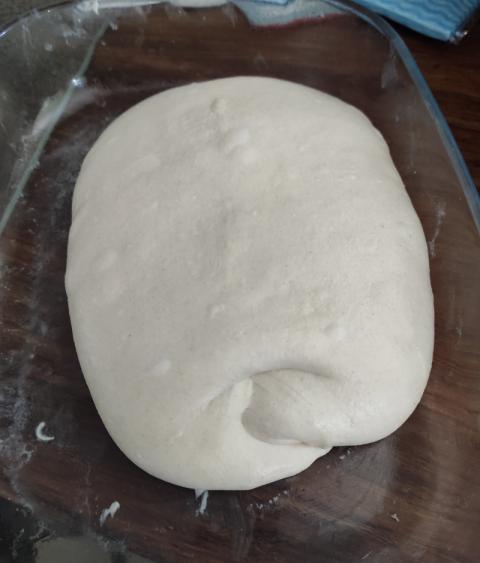
Used an all-in-one mix, no separate autolyse but the dough did get an hour's rest after mixing. Firstly mixed the almond milk and levain in a separate bowl, and used an electric egg beater to ensure the levain was fully distributed in the liquid and the almond milk [1] was not separated. Added all the dry ingredients together in another bowl and stirred the dry ingredients together. Then formed a cavity in the dry ingredients into which was poured the levain/almond milk mixture. Stirred with the handle of a wooden spoon and had to mix a little by hand for at most two minutes, then left the shaggy mixture to rest for one hour. After this hour the next 45 minutes were spent doing 3 sets of stretch and folds 15 minutes apart and it passed a simple window pane test.

The fairly stiff dough was then placed in a plastic tub in the fridge. Around 24 hours later the tub was removed, and final shaping was done immediately. It was left to rest covered (with a pot) for 45 minutes, then placed directly into a 'banneton' which consisted of a tea towel heavily floured with rice flour covering a ceramic bowl. The tea towel was folded gently over the top of the dough, and the bowl was placed in the fridge for a further 4 nights with baking the following morning.

4 nights is too long and I knew it, but life grew too busy to bake on the originally planned day which would have been after 3 nights which is what the recipe calls for. This method is forgiving and is known to work with 2-4 nights, and the true range is almost certainly wider than that! It does depend on the fridge temperature, my fridge is set to 5°C,  and the bowl was placed on a middle shelf of the fridge pushed to the back away from the door. A few weeks ago I attempted measuring my fridge temperature and can tell you that it fluctuates wildly, sometimes as low as 3.5°C and as high as 7°C when the door was open to remove food. Unfortunately, I didn't measure dough temperature which would have been more accurate.

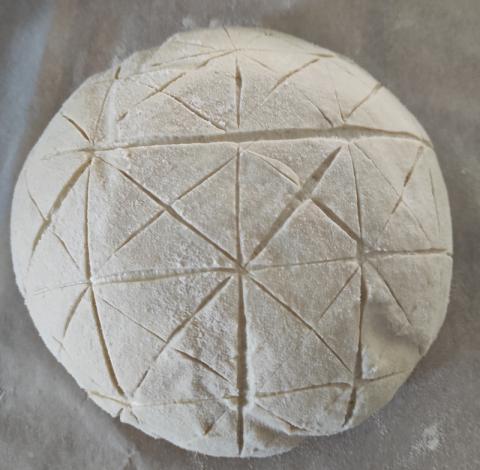
After the dough was removed from the fridge it was scored cold and baked immediately in the dutch oven at 260°C for 30 minutes covered followed by 230°C for a further 10 minutes or so until the desired colour was reached. It was immediately removed for cooling on a wire rack and cut after an hour and a half.

Scoring

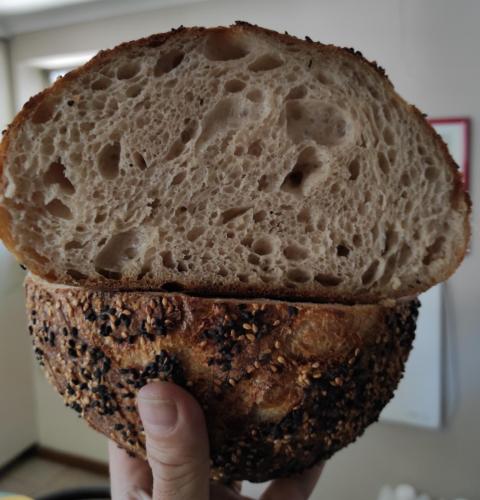
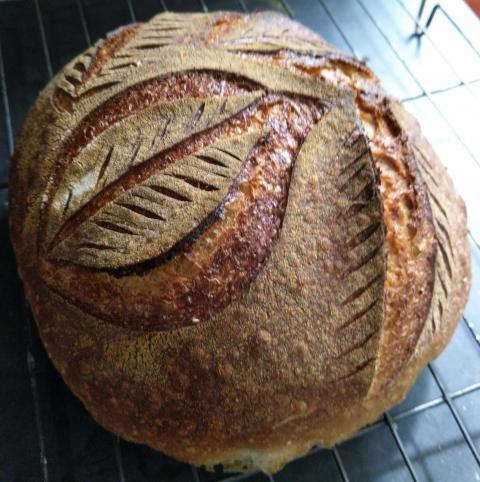
Scoring was my interpretation of the scoring used by Nikolai Meling. Didn't expect any ear with the decorative scoring, but as you'll see got one where the scoring from the 'wheat sheaf' ran into the one leaf.


Gauntlets

Got it in the oven, and then I threw down my gauntlets! Recently bought a pair of welders gloves to use as oven gloves when handling the cast iron dutch oven, and what a difference they make! Baked at 260°C for 30 minutes covered and then 230°C for around 10 minutes plus. To be fair I normally bake for 20 minutes covered at the higher temperature followed by a slightly longer time uncovered, but lost track of the time today.


Out of oven on lid

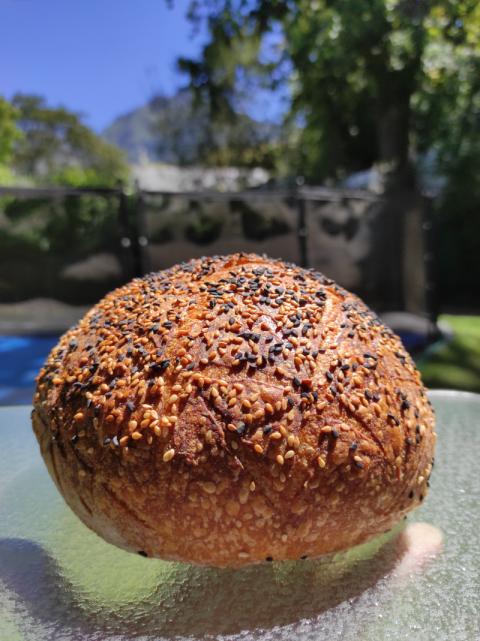
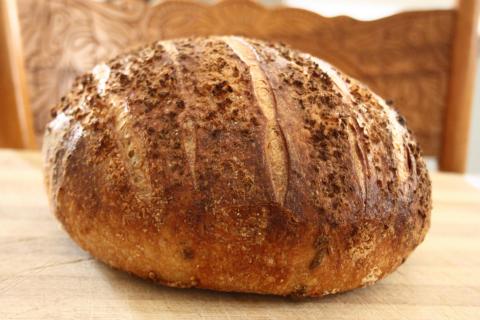
Sitting on the lid of the dutch oven after coming out of the oven. The parchment at the bottom is probably why I get the pale band at the bottom too, and now I understand why folks use corn grits on the base of their breads, but still haven't got my head around the trick of lifting the bread onto the hot dutch oven directly.  Interestingly, I don't get the band when I bake in the body of the dutch oven rather than on the lid as was done today.

Grigne

Ooh la la - la petite grignette est vraiment croustillant!

Texture

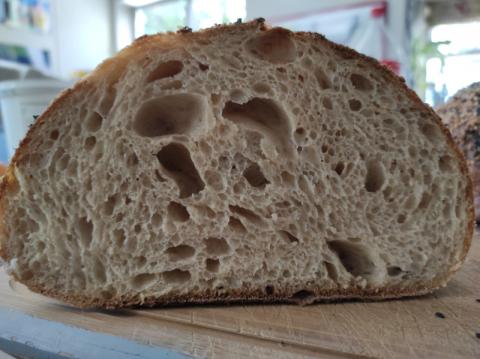
Texture and fluffiness is similar to what I would call a "brown bread". Was a little disappointed that it didn't have more open crumb than this, which is what I had with the milk variant. Soft and fluffy, however at the same time this is not the same soft texture you get with full cream milk either. Thought this bread would be sour from the long ferment, but it wasn't sour. Unfortunately sweeter than I would like, definitely don't buy sweetened almond milk next time. The same milk was used in making Maurizio's sandwhich bread with preferment though and for that recipe you can't tell it apart from his bread made with milk, probably because the sweetness is hidden by the sweetness of the honey. But, the texture is still quite nice and pleasant to eat and I'm not finished with experimenting with nut milks either.

Single slice


After baking, I took the time to read the packaging for the flour used. Probably would have made sense to read it before baking, eh? What I didn't realize is my flour is "Coarse White flour has a granulated texture, with wheat germ and bran in small pieces, in addition to the endosperm." [2] Oh dear, thought it was like a normal bread flour and didn't "keep refrigerated", for the last month or more that I've had the bag. Luckily not rancid. No idea of protein content. Thinking now that the smallness and tighter crumb were because this is more like a bread with higher amounts of wholewheat.

Notes:

[1] The almond milk I used has these ingredients: water, sugar, 4% almond, sunflower lecithin and sea salt and is marked as sweetened and suitable for cooking, product of Spain!

[2] The coarse white flour is this one.

Pages

Subscribe to RSS - JonJ's blog